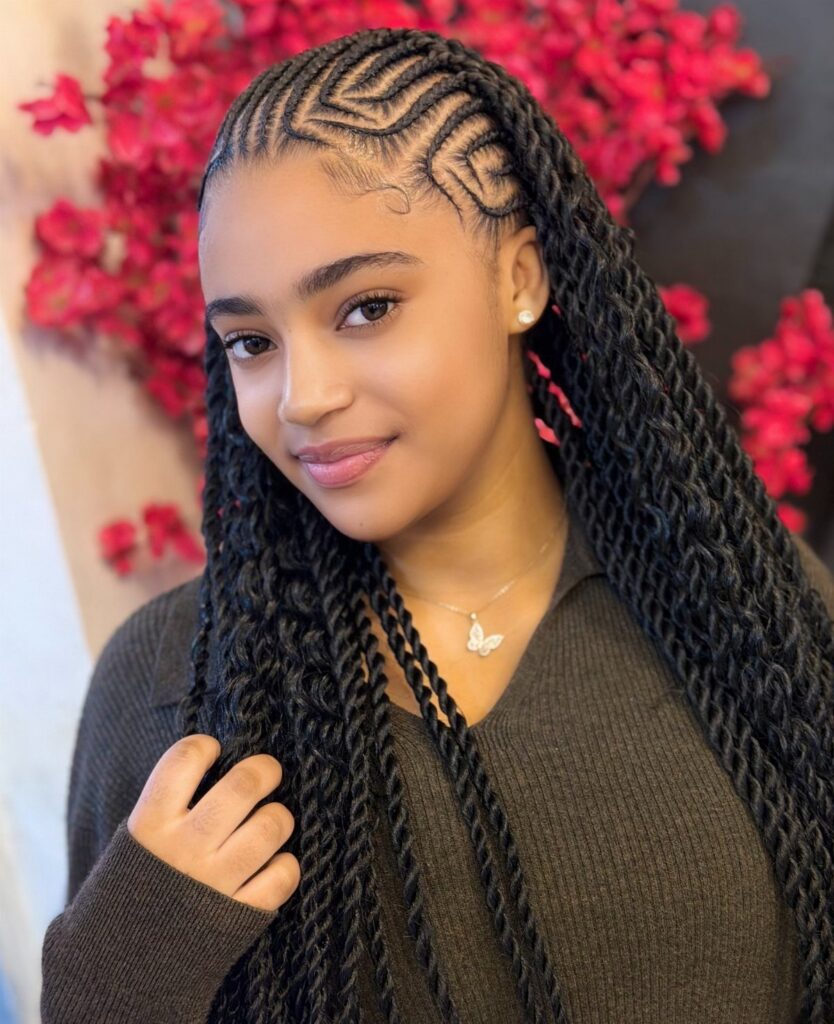
Section size sets the appointment length: Micro Braids take far longer than Box Braids, since smaller sections add up to more braids.
Micro Braids and Small Goddess Braids mean a long day in the chair, while Dutch Braids and the Braided Half Up-do are easy to manage at home with a hand mirror.
The styles here run from the short Braided Bob to the longer Knotless Goddess Braids. Choose the style from this list that fits the hours you can sit still, then save its photo to show your stylist.
1. Braided Ponytail
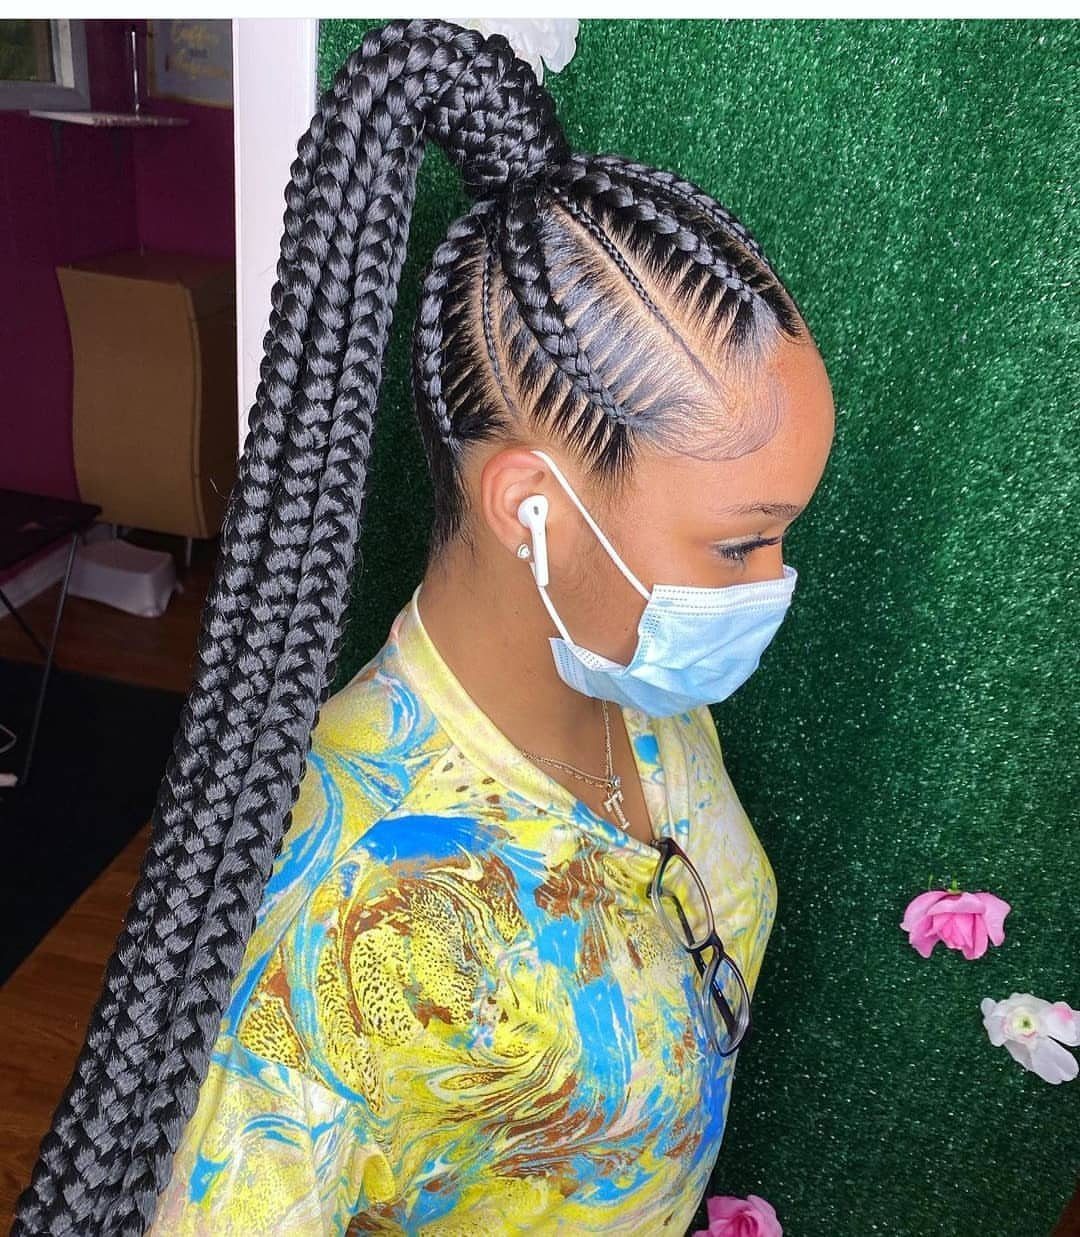
A ponytail set high on the crown keeps the braid work on display, and cornrows leading up into it give the whole style a clean line from hairline to tip.
Gather the hair at the highest point you can comfortably hold, then secure it before you braid or wrap anything. A snug elastic matters more than any accessory here, since the ponytail carries all the weight.
This is an easy one to ask a stylist for by name: cornrows into a high ponytail.
2. Braided Bun
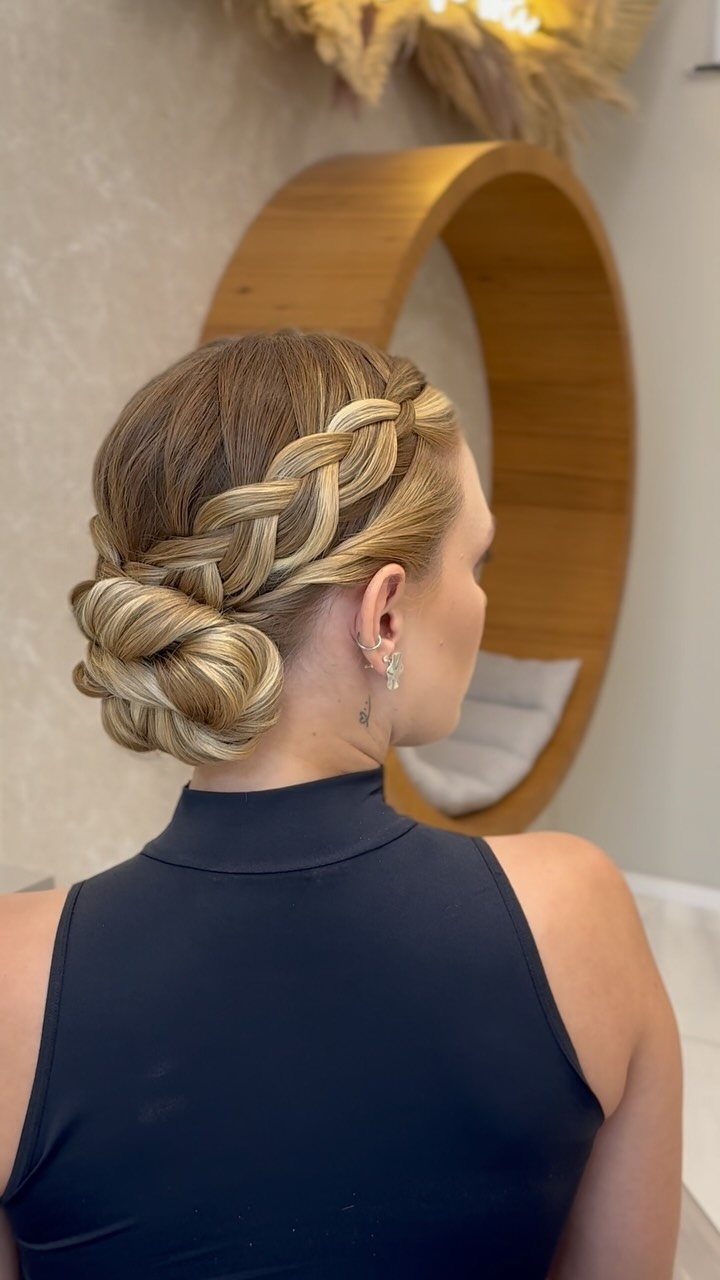
Braids pinned into a low bun are a good answer for days when hair needs to be off the neck but still look finished. A thick braid coiled at the nape reads as dressed up without much effort.
I like the low placement best. It sits comfortably under a hat or against a chair back, and it suits blonde, straight-to-wavy hair where the braid’s thickness shows.
Braid first, then wrap the length around itself and pin it flat. Bobby pins matching your hair color disappear into the coil.
3. Cornrows
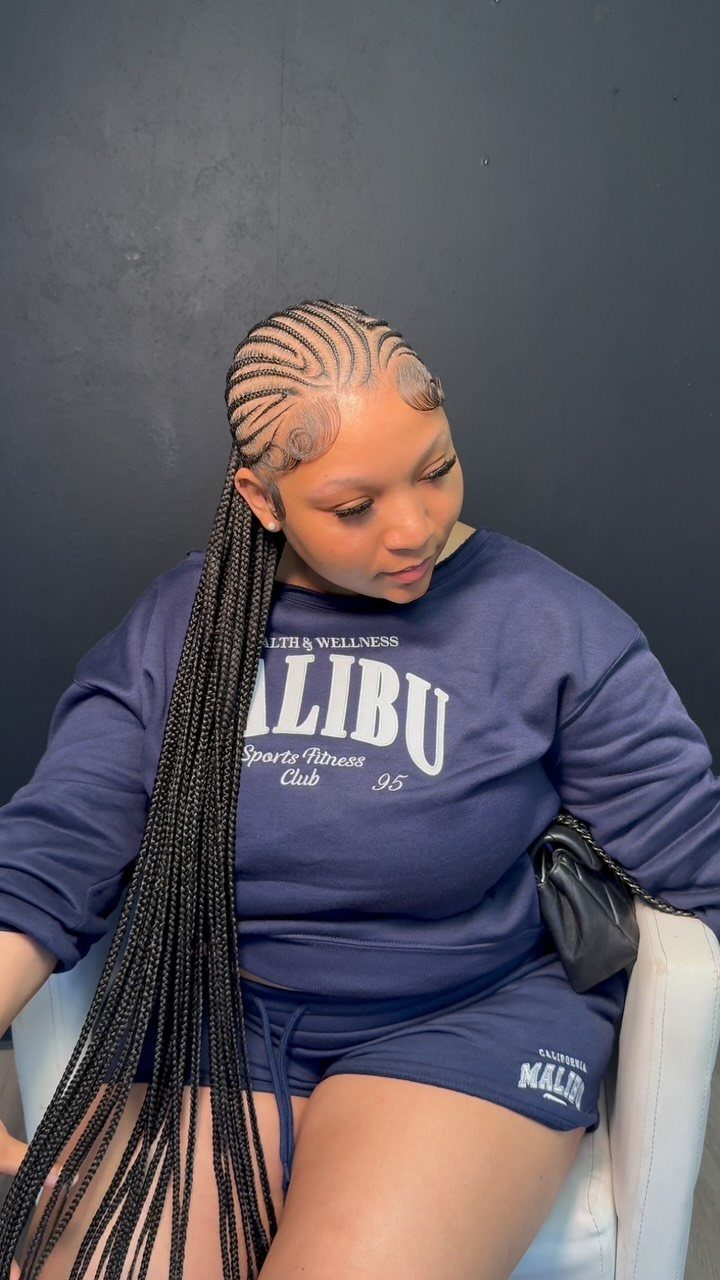
Cornrows are the style where the parting does the talking. Because the braids lie flat against the scalp, curved or patterned lines show off every turn, and they can run into loose braids that hang long.
Bring a clear photo of the pattern to your stylist, since a curve is hard to describe in words. Ask where the cornrows end and the free braids begin, because that spot sets how much length swings around your shoulders.
For daily wear, it’s one of the lowest-effort styles I know once it’s done.
4. Box Braids
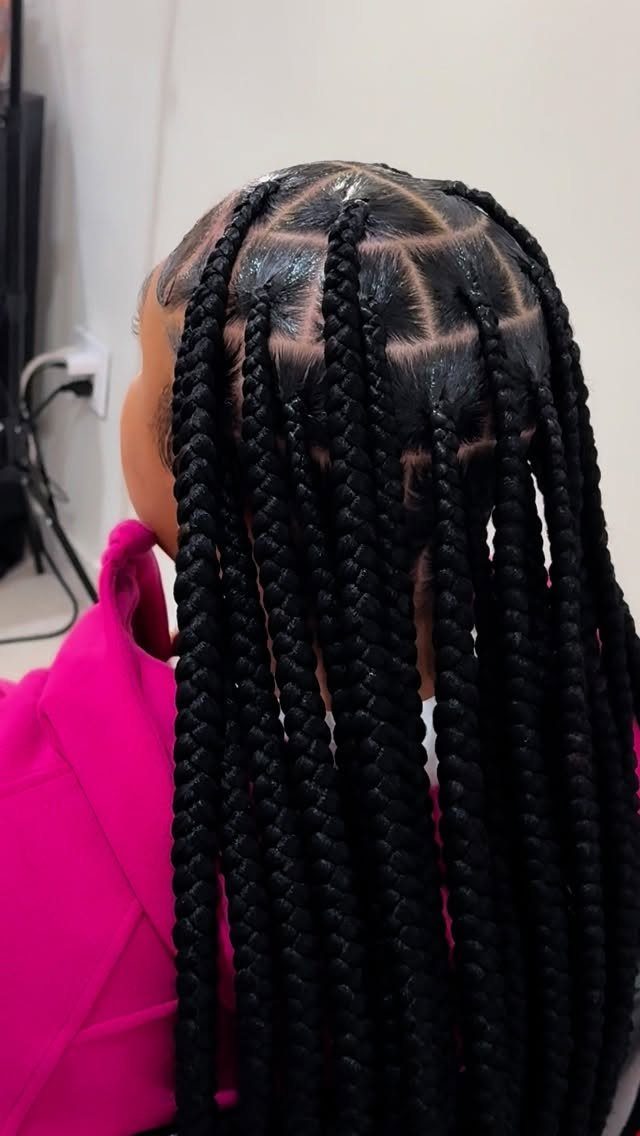
Box braids start from square sections of hair, and that grid parting is what gives them their tidy, boxy scalp pattern. Long and black, as they appear here, they hang in even rows that look sharp from behind.
Ask for the size of the squares at the appointment, because smaller squares mean more braids and a longer sitting. Larger squares go faster but look chunkier.
Box braids frame your back and shoulders in a way that feels dependable every time. Keep the part lines in mind, since they show the most.
5. Dutch Braids
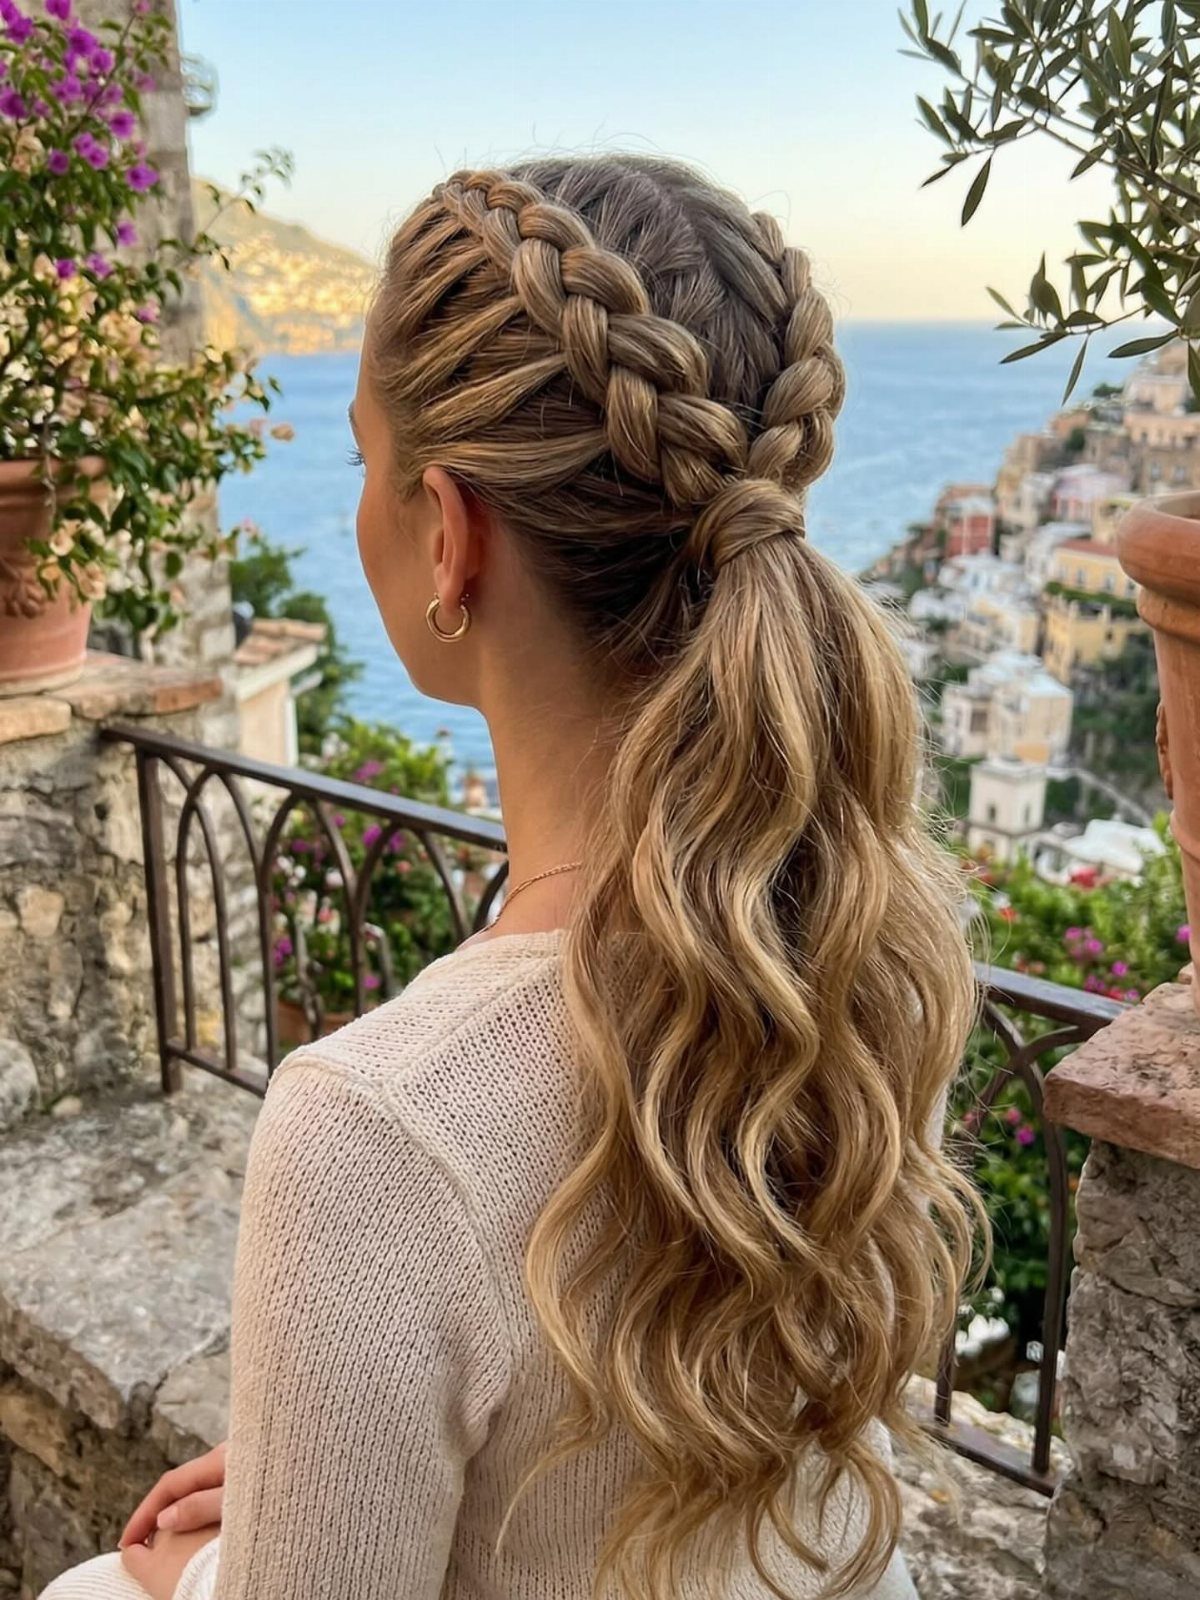
Dutch braids work by crossing each strand under instead of over, so the braid rises off the head and stays defined.
That raised ridge is why I reach for Dutch over a standard French braid when the braid should be the focus.
Take your time at the crown and keep each section the same width. Pull gently as you cross, because loose sections flatten the raised look.
Finish into a ponytail and let the length fall in waves. This one is realistic to do at home with practice, and a mirror behind you helps.
6. Knotless Braids
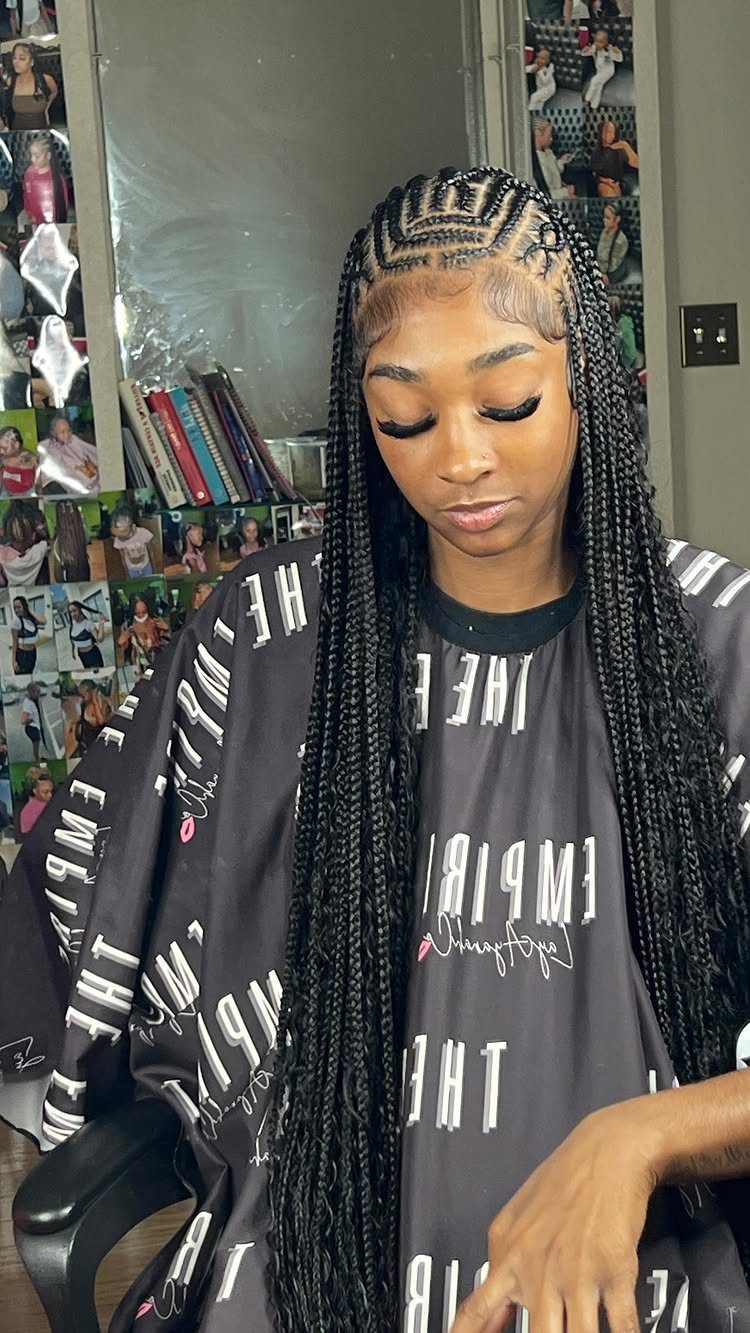
Knotless braids begin with your own hair alone, and the extension is fed in gradually as you go, rather than knotted on at the root.
That makes the base flatter and the parts look neater, which is what you see in the curved scalp lines here.
I’d pick knotless over classic box braids if a flat, natural-looking start matters to you. Ask your stylist for the feed-in method by name.
At the root, the difference shows most. Pay attention to how the first inch looks when you’re choosing a stylist.
7. Boho Braids
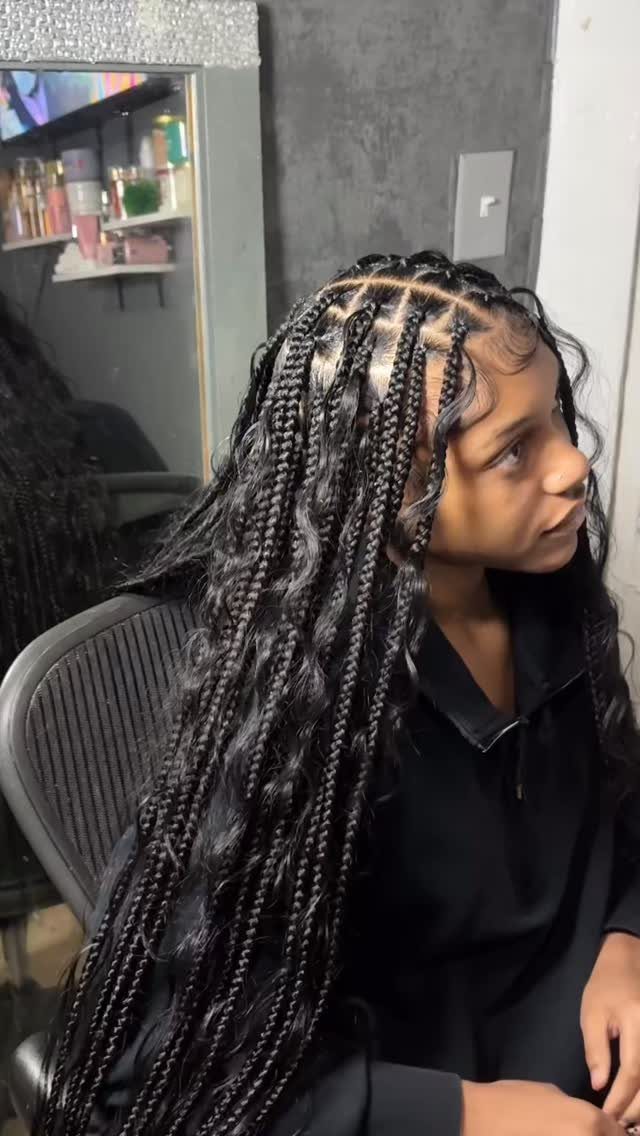
Loose curls left out through the braids give boho braids their relaxed, romantic look. The braid holds the structure while the curled pieces add softness around the face and through the length.
Ask to leave curly strands free as she braids, so the texture looks intentional and not frayed. I like this version on long hair, where the curls have room to move.
Take a reference image and point to how much curl you want showing.
8. Micro Braids
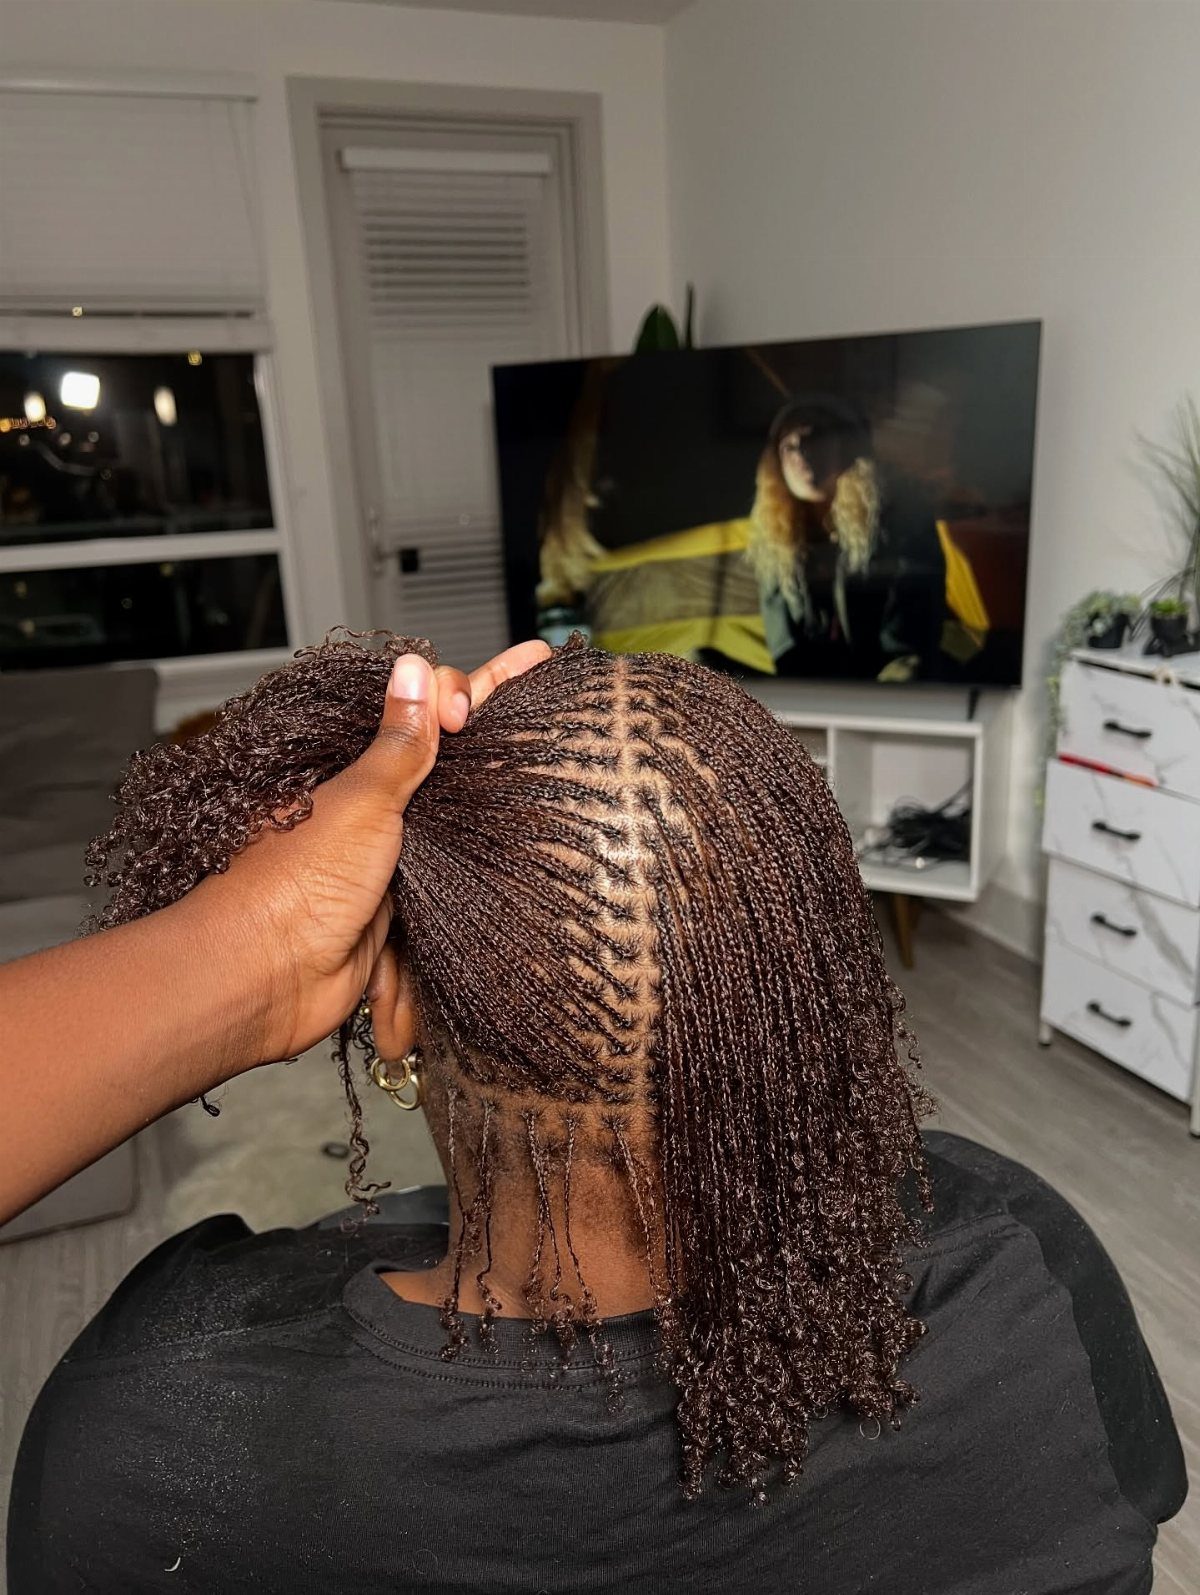
Micro braids are the smallest braids on this list, and that size is what makes them move.
Each one is thin enough to swing and settle like loose hair, so the finish looks sleek and natural from a few feet away.
Expect a long appointment, since every section is parted by hand and there are so many of them. Ask for curly ends for a softer finish than a blunt, straight tip.
I’d choose micro braids for movement over any chunkier style here.
9. Fulani Braids
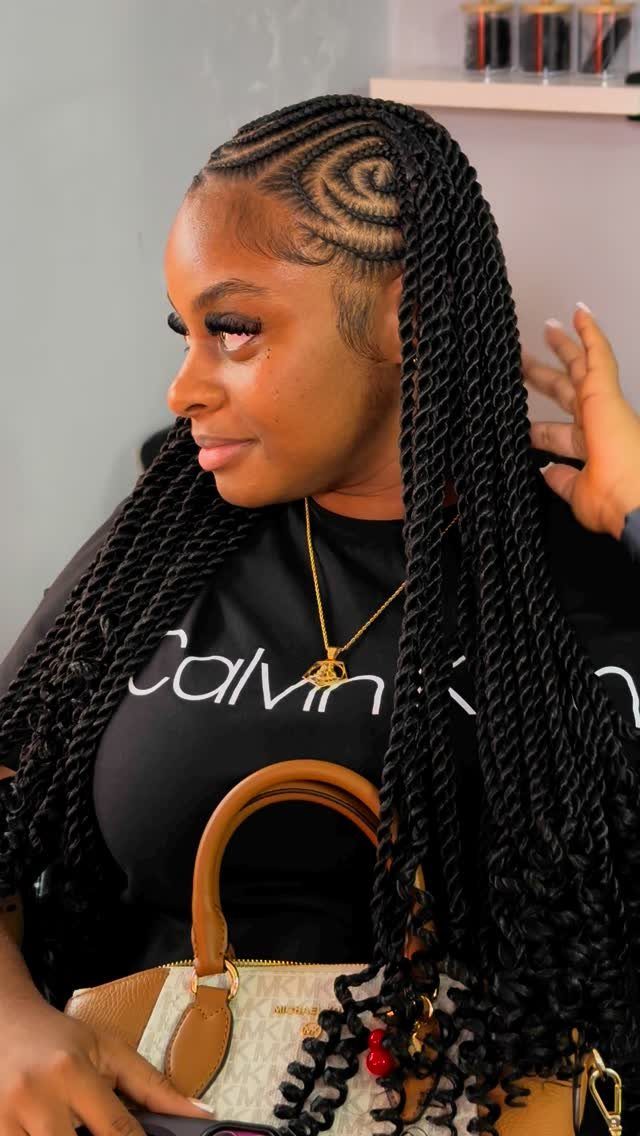
Fulani braids split the head in 2 parts: cornrows up front, individual braids behind. The cornrows can curve and wind along the hairline, then give way to long free braids that hang down the back.
Accessories like gold cuffs or beads are an add-on if you want more detail.
10. Crochet Braids
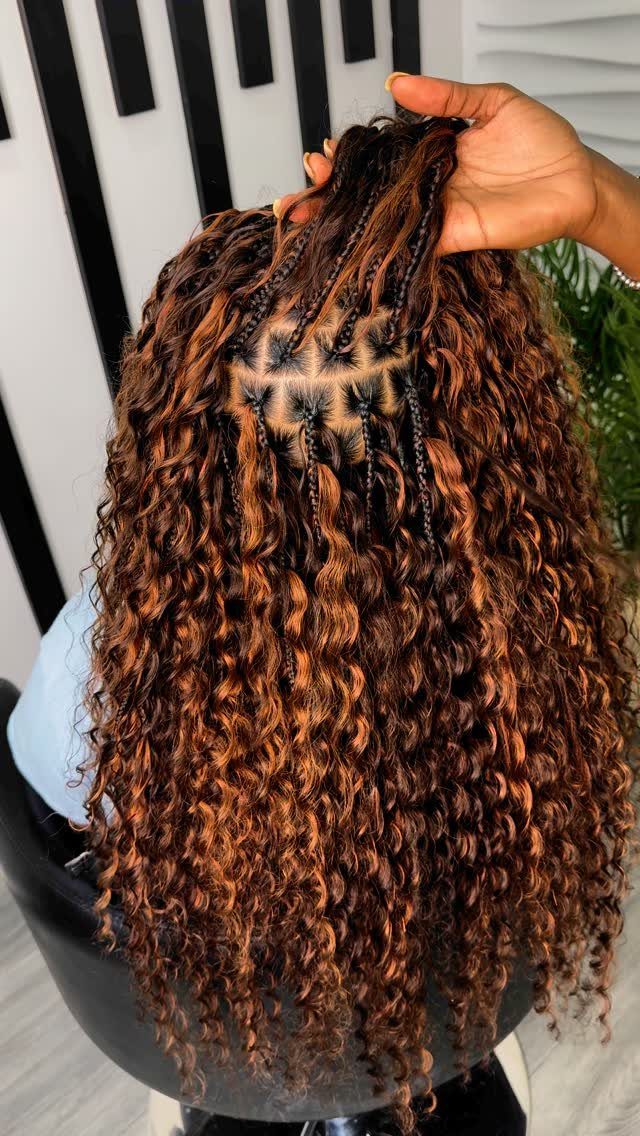
Crochet braids start with a braided foundation close to the scalp, and the extension hair is attached to it at the roots. Curly hair gets looped onto that base instead of being braided in strand by strand.
That setup lets you pick the texture separately from the braiding. I like crochet for anyone who wants a curl pattern different from her own without styling it every morning.
Ask your stylist how flat the base braids will lie, because the foundation is what you feel and see at the part.
11. Braided Bob
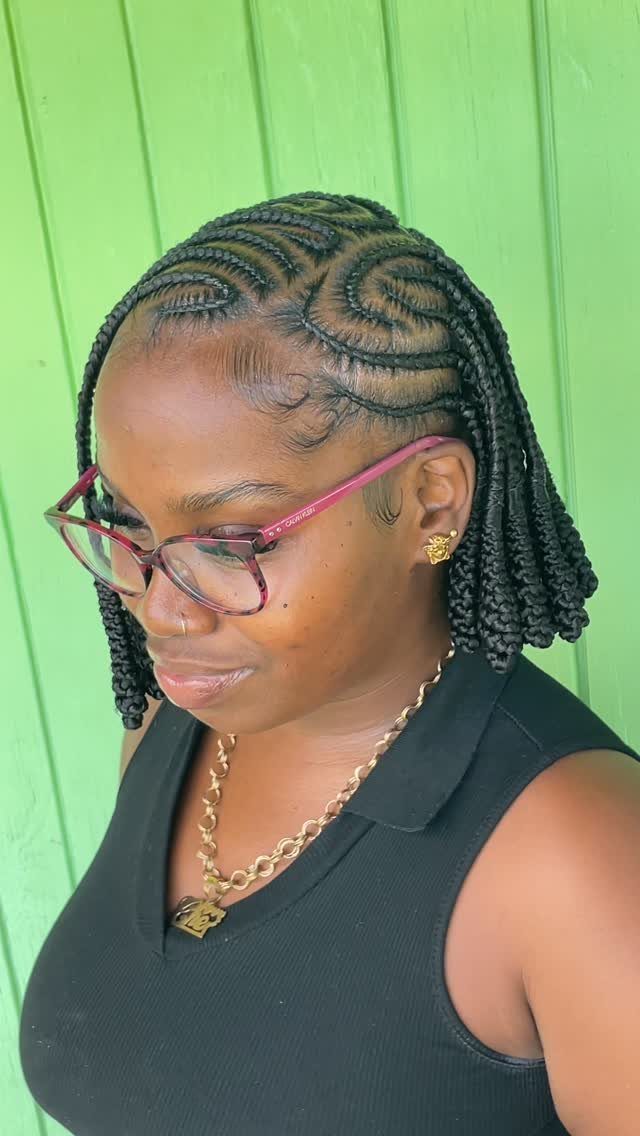
A braided bob keeps the length short, so the braids end around the jaw instead of past the shoulders.
Tell your stylist the exact length you want and where it should land on your face. Short braids are lighter to wear than long ones, which I count in their favor.
Glasses sit well with this cut, since nothing hangs over the frames.
12. Knotless Goddess Braids
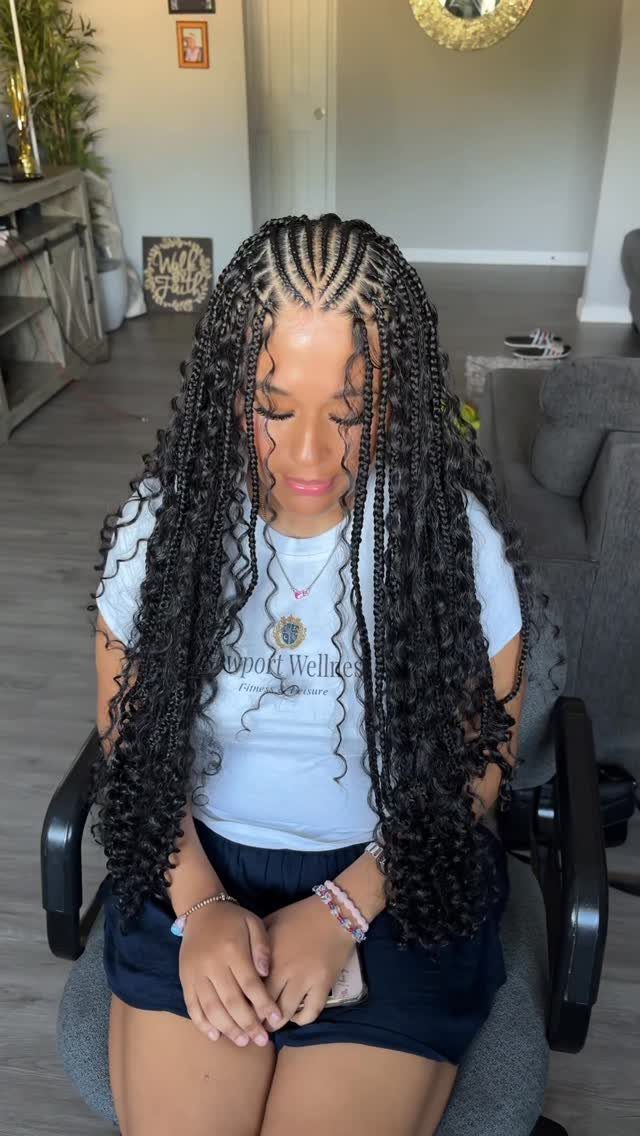
Knotless goddess braids pair the flat, feed-in start of knotless braids with loose curly ends. The braid runs smooth down the length, then the curls spring free at the tips.
Ask your stylist for knotless goddess braids by name, and say how much curl you want left out at the ends. Curly tips take the weight off the face and give the length a soft finish.
I’d choose this over plain knotless if you like a looser, romantic shape without giving up a neat part.
13. Goddess Braids Bob
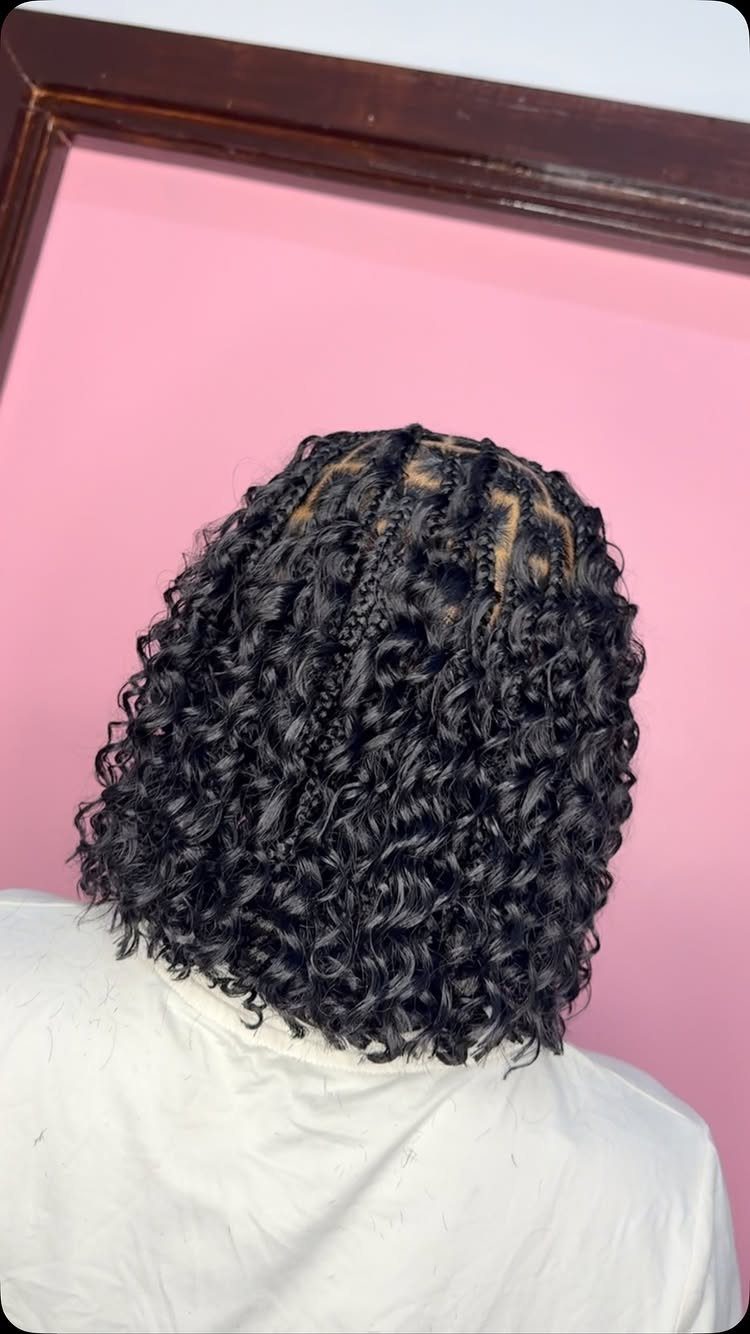
Length is the only thing that changes here: goddess braids cut to a rounded bob with curly ends at the back of the head, instead of hanging past the shoulders.
Tell your stylist exactly where the ends should land, and bring a photo of the back view. With a bob, a half inch reads very differently.
I like the short version for how neat it looks. The curls do the work, so there’s nothing left to style.
14. Boho Goddess Braid
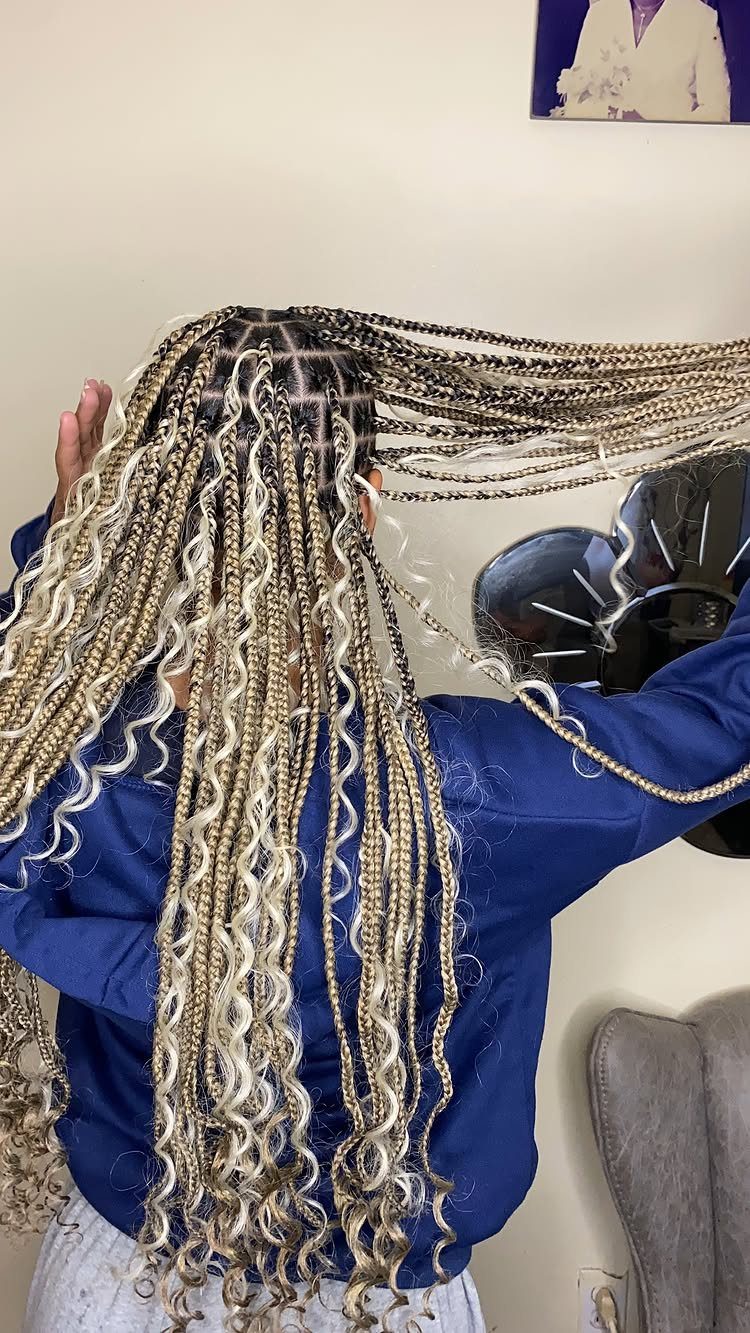
This boho take on the goddess braid mixes blonde and brown with curly, pale strands left loose through the length.
Since the color blend is half the look, bring a photo and point to where the blonde and white should sit. I’d keep it long, because the loose curls need room to spread and show against the braids.
Picture the braids after the curls loosen and the hair is down, because that is how they will look for most of the week, not just on day one.
15. Crochet Goddess Braids
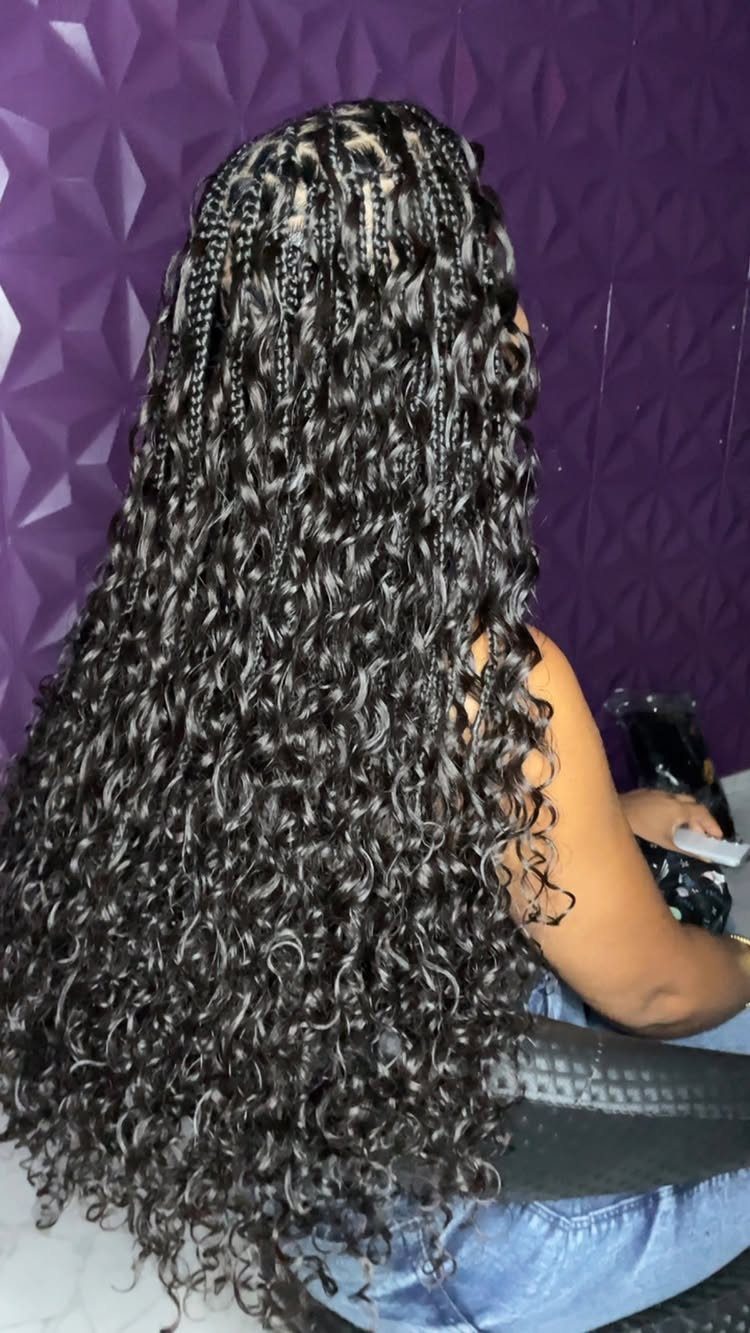
Crochet goddess braids add fluffy, crocheted twists to a goddess braid base, so the curls look full from the root down.
Name both parts when you book: goddess braids, done with crochet.
Then say how long you want the curls to fall and how thick the twists should look. Longer lengths show the most curl, since the loose ends have room to coil and swing.
I’d pick this over plain goddess braids for volume. Expect more hair to carry than with a smooth, braided length.
Goddess braids are a beloved protective style for a reason—the versatile look was a symbol of creativity and artwork in ancient Africa and is still a go-to hairstyle to this day.
— Glamour
16. Small Goddess Braids
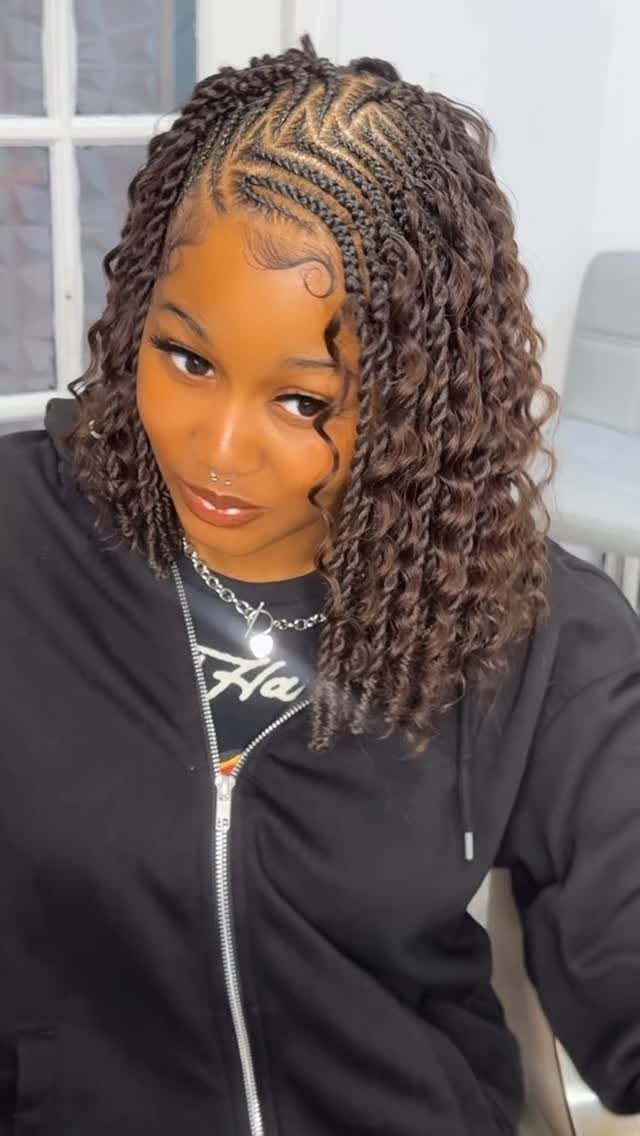
Small goddess braids land between cornrows and micro braids in size: thin enough to look delicate, still big enough to see each plait and the curls it ends in.
Smaller braids mean more of them, which means more time in the chair. Bring a photo and ask your stylist to match that size, since "small" can mean different things.
Curly ends over one shoulder are my favorite finish. They soften the neat parting without hiding it.
17. Braided Half Up-do
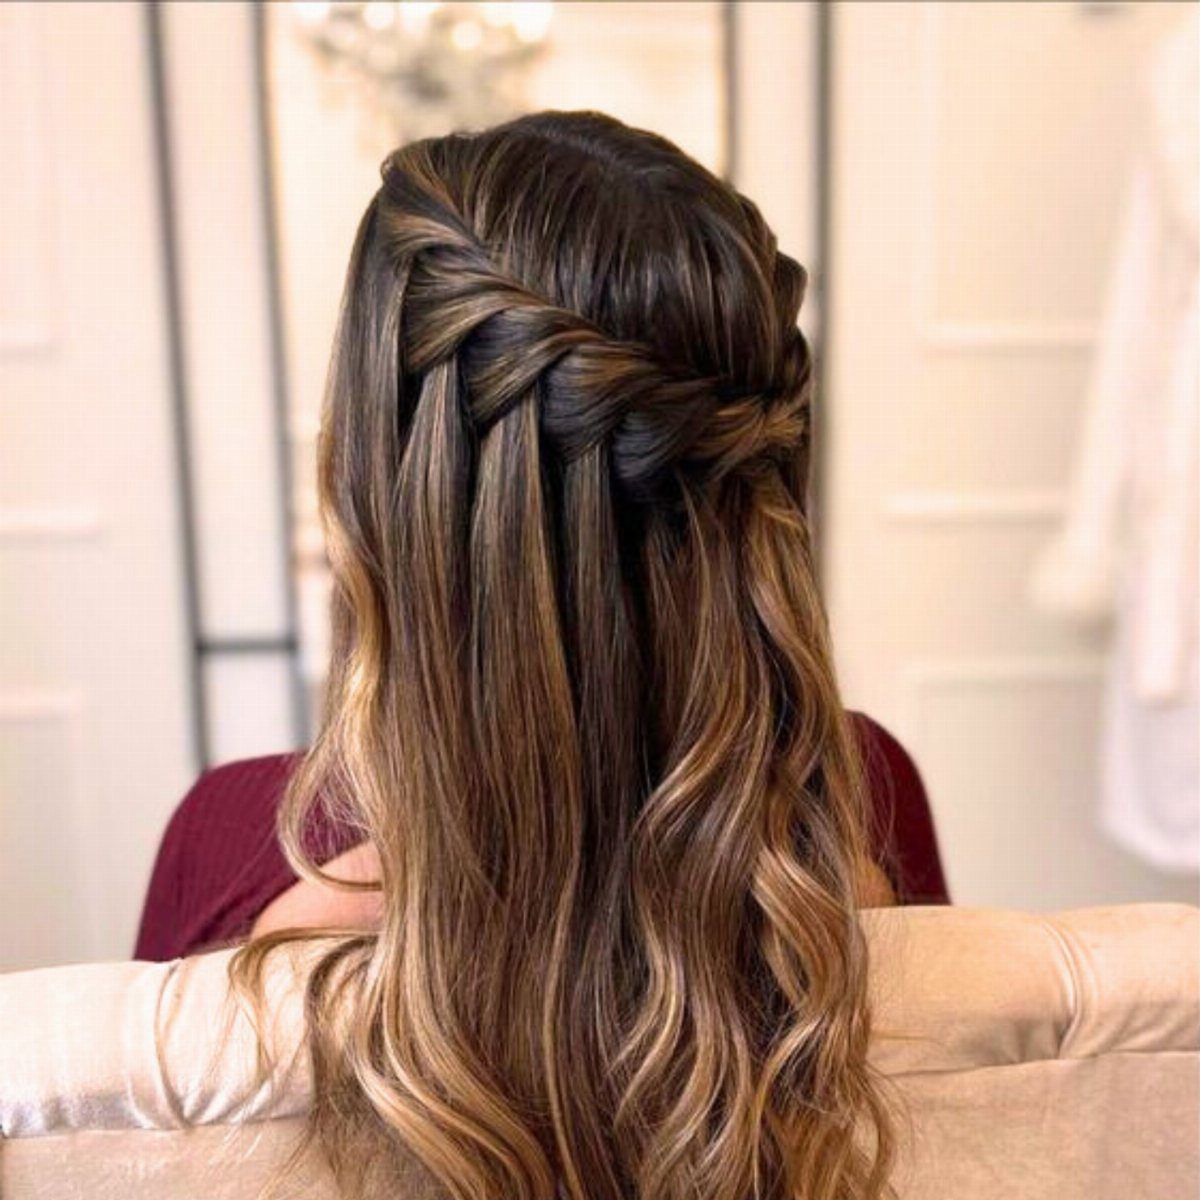
A thick fishtail braid worked across the back of the head turns an ordinary half up-do into something that looks planned. The lower half stays down in loose waves.
Keep the braid snug at the start and secure it with a clear elastic that blends into brown hair.
It’s a style I’d try at home before a salon visit, with a mirror behind you.
18. Lemonade Braids
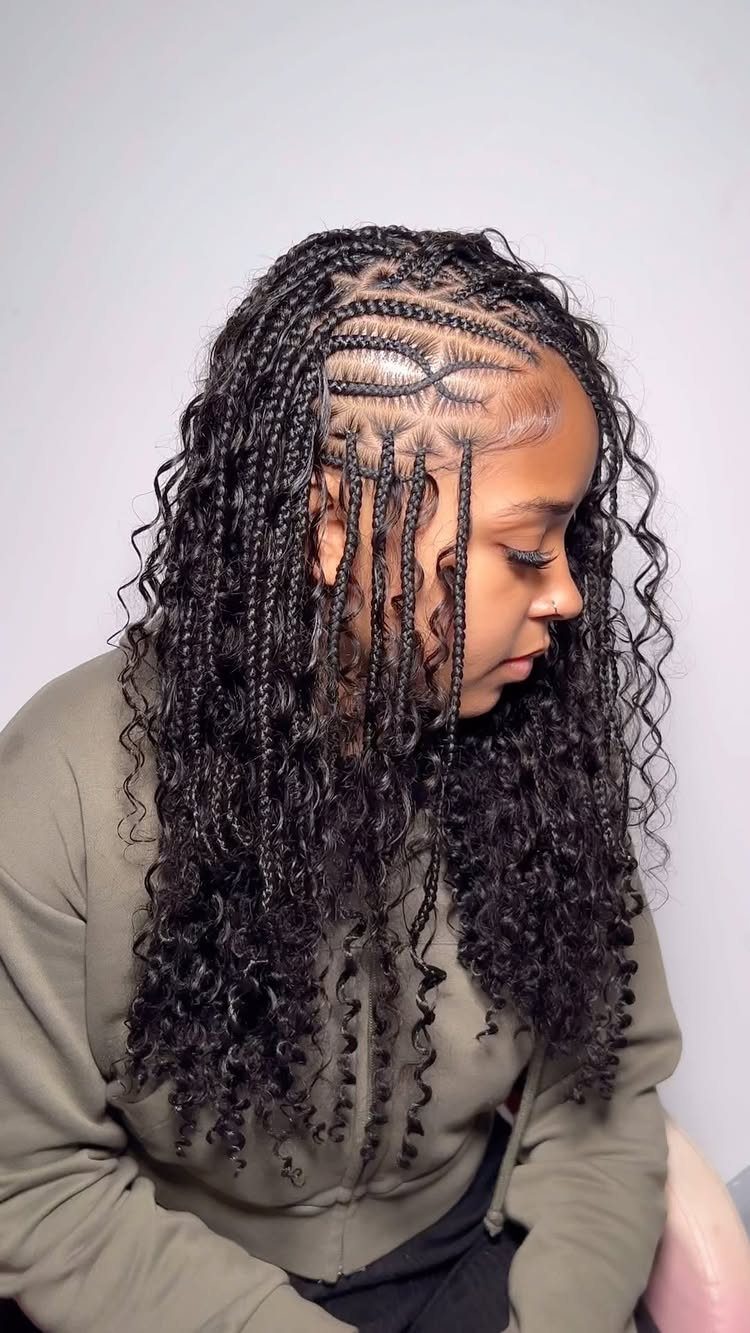
Every braid in lemonade braids leans the same way: cornrows sweep to one side from a deep side part, then continue into long, curly lengths.
The part is the detail to get right. Show your stylist a photo and say which side you want it on, since that decides where the braids start.
I’d choose this for a strong side-swept shape that stays neat from the front. Ask for curly ends if you want the finish to look softer.
Protective Braid Upkeep
Dilute shampoo with water, apply it to the scalp, and massage gently. Rinse with plain water without scrubbing or piling the braids up, because extra handling is what raises frizz.
After washing, work a light conditioner through the length and press a towel against the braids rather than scrubbing them dry. Let them dry completely, since damp braids can bring on mildew or scalp irritation.
A few drops of oil or a leave-in spray on the scalp will stop the itch before it starts. Go easy on heavy creams and gels, which build up under braids; a light spritz does the job.
After swimming, rinse with clean water to clear out chlorine and salt water, then dry the braids fully.
Sleep on satin or wrap your hair in a satin scarf to keep the surface smooth. Loose curly pieces need extra care, so detangle them gently and don’t tug.
Preparing for Braiding
Wash and condition first, then wait until hair is bone dry before you start. Wet or damp hair stretches and snaps more easily, and that adds up after a few weeks in braids.
Detangle gently with a paddle brush first. Smooth sections make neater braids and put less stress on the scalp.
If you have texture and want the braid to sit flat and tight, blow out and press the hair before you section it. Keep the heat moderate.
For afro-textured hair, I’d book a professional who braids with minimal tension. Tight braids pull on the scalp, and that is the part of the process worth paying for.
If the style uses synthetic hair, test your skin’s sensitivity to it before the appointment. Hold a small piece of the extension against your skin, and watch for itching or redness.
Frequently Asked Questions
What are some good hairstyles for medium box braids?
Pull them into a high ponytail or pin them into a low bun.
The ponytail keeps the braid work on display, and you should gather it high and secure it with a snug elastic first, since the elastic carries all the weight.
A coiled low bun at the nape lifts medium box braids off your neck and still looks polished, and it slips under a hat without a bulge, which is why I pick it.
Wearing them loose is the other classic option.
How do I braid my own hair into a cute style?
Wash and comb out your hair first, then divide it into 3 equal parts before you cross any strands.
Cross the right section over the middle, then the left over the new middle, and repeat to the end before tying off with an elastic.
For a Dutch braid, cross each section under instead of over, which lifts the braid off your head; keep the sections the same width and pull gently as you cross. A mirror behind you makes practicing at home easier.
How do you maintain goddess braids?
Cover your hair with a satin scarf or bonnet at night, or sleep on a silk or satin pillowcase, to keep the surface smooth.
Wash by applying diluted shampoo to the scalp, rinse with plain water, and let the braids dry completely.
Dab a little oil or leave-in spray onto your scalp 2–3 times a week to calm itching. Heavy creams and gels pile up between the braids, so I’d leave them out.
What is the difference between goddess braids and bohemian braids?
Goddess braids look more structured and neat, while bohemian braids are looser and messier, with curls added throughout or to selected braids.
Knotless goddess braids are the polished version: flat and smooth along the whole length, with curls showing only at the ends.
For the boho look, tell your stylist to leave some curly pieces loose, so the texture reads as planned and not frizzy.
Are goddess braids good for your hair?
Yes, when they’re done well. They’re described as a protective style that can shield natural hair from the elements for 4–8 weeks.
Tight installs or braids worn too long can still snap hair, so with afro-textured hair I’d pick a pro known for a light hand. Braiding on fully dry, detangled hair helps too, because damp strands stretch and break more easily.
What happens when goddess braids get wet?
Rubbing or stacking wet braids stirs up frizz, and braids that stay damp can grow mildew or irritate the scalp. Press a towel against them instead of scrubbing, then let them dry completely.
Once you’re out of the pool or ocean, flush the braids with fresh water to wash off chlorine and salt, then dry them. Keeping the braids covered in the shower also helps them stay neat.
Can you braid hair extensions?
Yes: extensions go into a braid the same way your own hair does, provided they’re anchored firmly.
Take even sections, keep each braid smooth, and go easy on the pull; heavy tension can hurt your natural hair as well as the extension.
Knotless braids add the extension bit by bit, starting from your own hair, instead of tying a knot at the root, so the base lies flatter.
Before your appointment, rest a small piece of synthetic hair on your skin for a while and see whether it itches or turns red.





