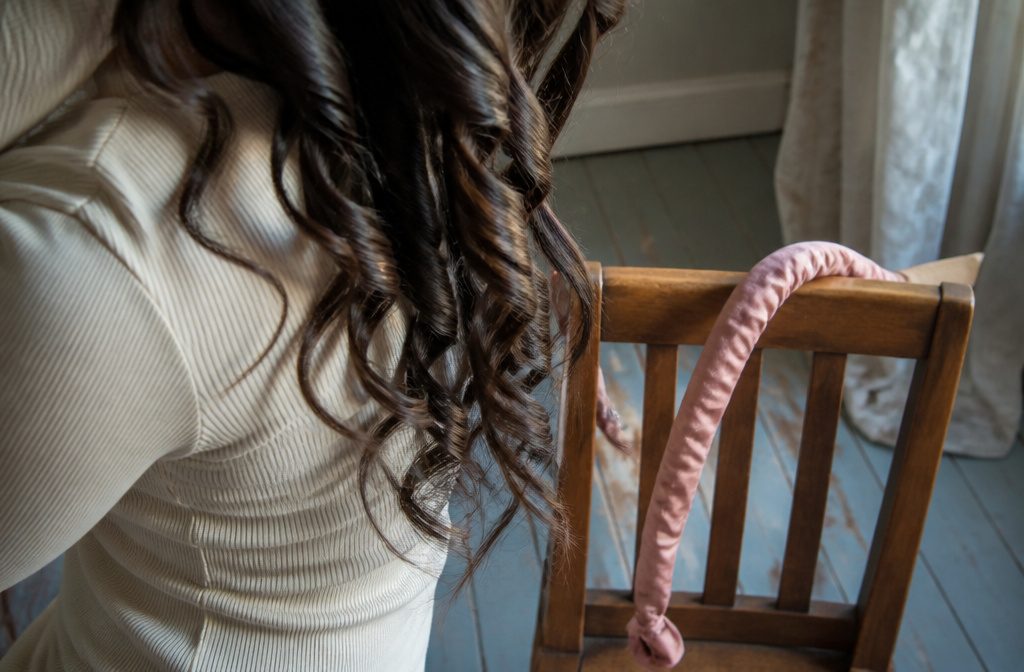
Curls take anywhere from 5 minutes with ponytail curling to an overnight braid set, and the step people rush is cooling: warm curls pulled or brushed through relax fast.
The Curly Girl Method only enhances existing waves, so straight hair needs heat, heatless wraps, clip-ins or a perm instead.
1. Curl with a Straightener
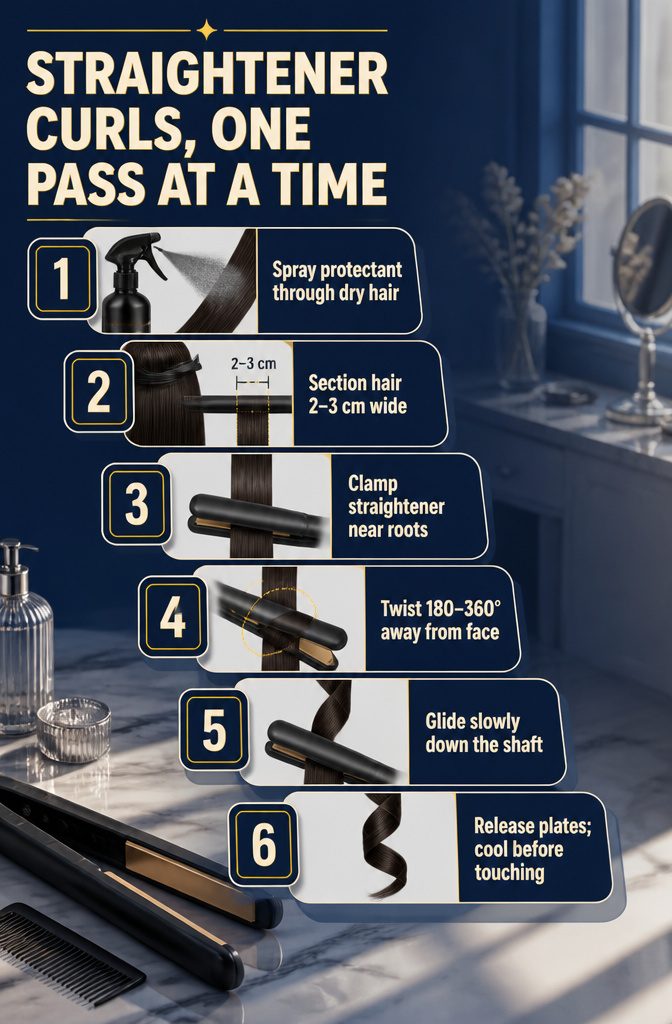
- Spray heat protectant through dry hair.
- Split the hair into sections 2–3 cm wide, roughly 1 inch.
- Clamp the straightener near the roots.
- Twist it 180–360 degrees away from your face.
- Glide it slowly down the shaft.
- Release the plates and let the curl cool before you touch it.
Section size and rotation set the result.
Smaller sections, a full turn and a longer hold give tighter curls, while larger sections and a half turn give loose waves. For an everyday look, I’d start with the loose version, since it forgives uneven sections better.
2. Curl with a Curling Iron or Wand
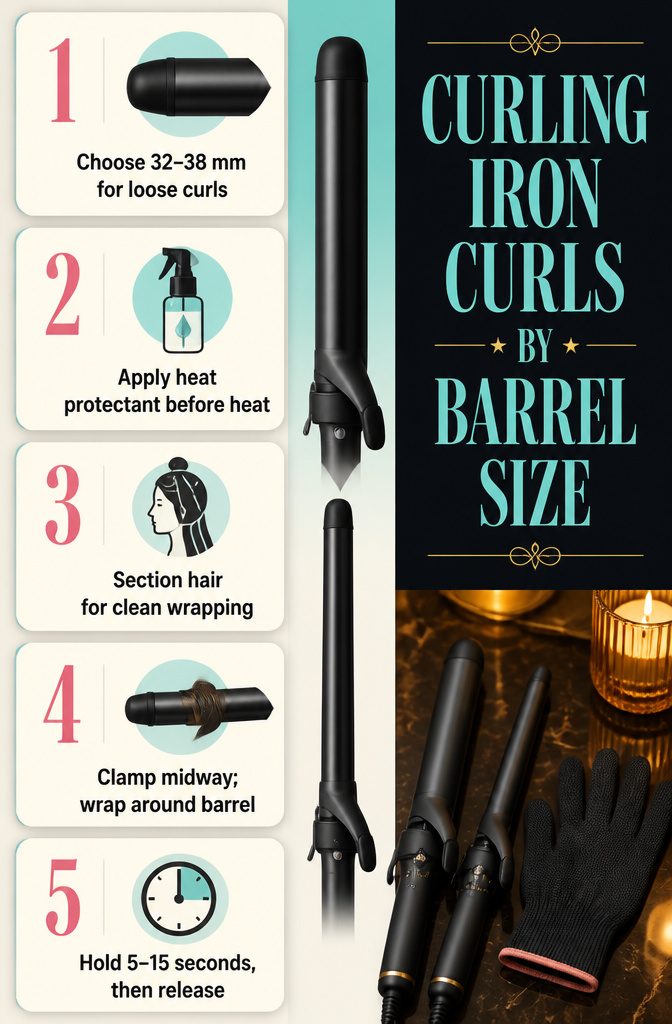
- Choose the barrel: 32–38 mm for loose, beachy curls, or 19–25 mm for tighter ones.
- Apply heat protectant before the iron touches your hair.
- Section your hair so each strand wraps cleanly around the barrel.
- Clamp a strand midway, then wrap it around the barrel.
- Hold for 5–15 seconds. Finer hair needs the short end of that range, and thicker hair does better with a slightly longer hold.
- Release the curl gently and let it cool before you touch it. Running fingers through a warm curl pulls it loose.
3. Use the Five-Minute Ponytail Curl Hack
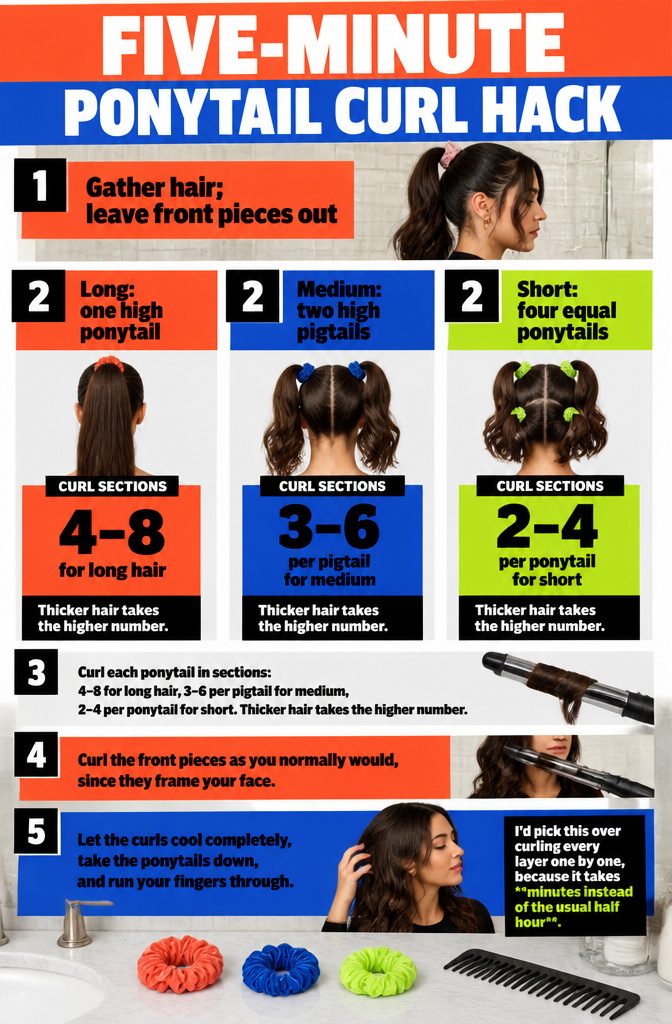
- Leave the front pieces out and gather the rest with a scrunchie. Long hair goes into one ponytail, as high as you can get it.
- Medium hair goes into two high pigtails. Short hair goes into 4 equal ponytails, each with its own scrunchie.
- Curl each ponytail in sections: 4–8 for long hair, 3–6 per pigtail for medium, 2–4 per ponytail for short. Thicker hair takes the higher number.
- Curl the front pieces as you normally would, since they frame your face.
- Let the curls cool completely, take the ponytails down, and run your fingers through.
I’d pick this over curling every layer one by one, because it takes minutes instead of the usual half hour.
4. Braid Damp Hair Overnight
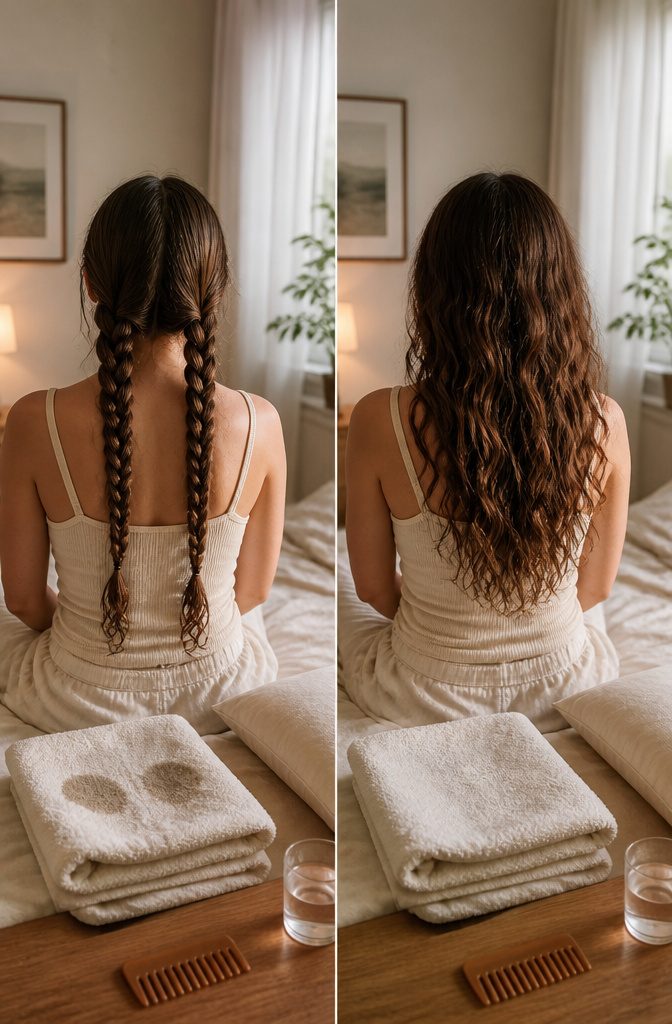
- Start with hair that is slightly damp, not soaking wet. Towel-dry first if your strands are dripping.
- Split your hair into two or more sections. The section count sets the result, so decide the look before you part anything.
- Braid each section. Smaller, tighter braids give tighter curls, while fewer, looser braids give soft waves. For loose beach texture, I’d stop at two braids.
- Sleep with the braids in place.
- Unravel them in the morning, then finger-comb or shake the hair out gently for a soft, natural finish.
5. Use Heatless Curl Ribbons or Rods
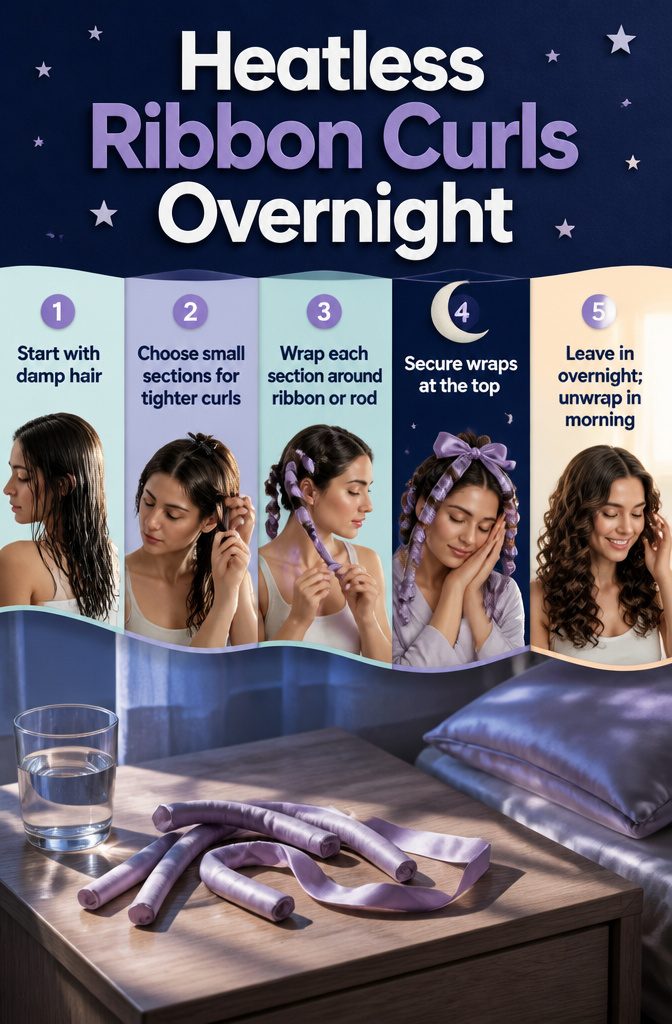
- Start with damp hair. The curl sets as the section dries around the ribbon or rod.
- Split your hair into sections. The smaller and tighter the section, the curlier the result, so I’d go small if you want defined, springy curls rather than loose waves.
- Wrap each section around a ribbon or flexi-rod.
- Tie or secure the wrap at the top so it holds while you sleep.
- Leave everything in overnight.
- Unwrap in the morning, one section at a time.
This method wins over an iron if heat damage is your worry, since nothing hotter than your pillow touches your hair. The cost is sleeping in the wraps.
6. Use Sock Curls or Rag Curls
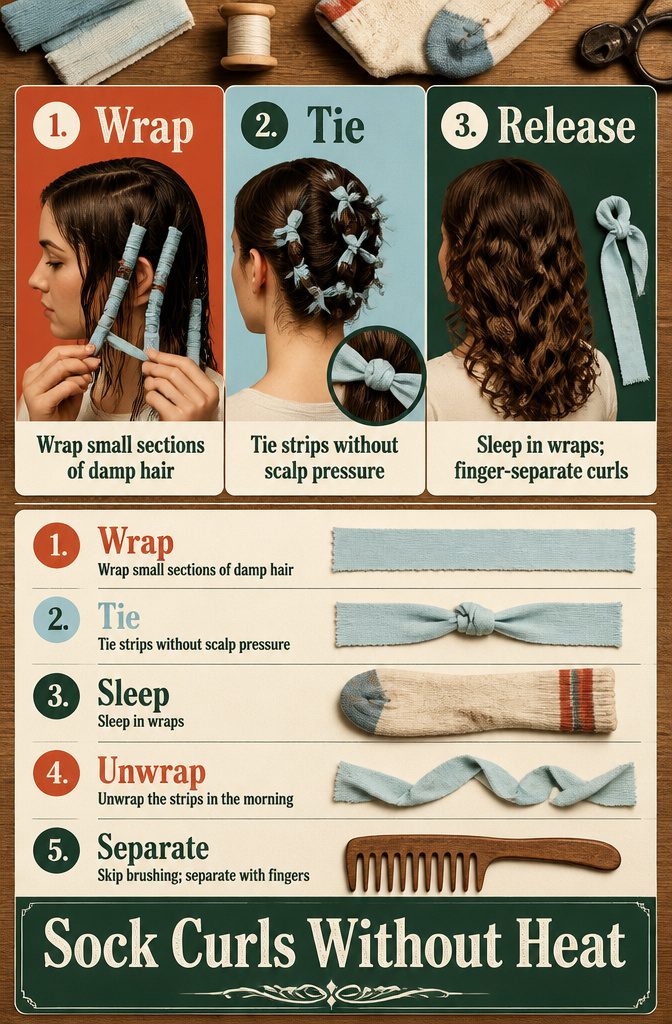
Rag curls are old-school, but they still give bouncy, vintage-style curls with nothing more than clean scrap fabric or old socks.
- Wrap. Cut the socks or fabric into strips, then wrap small sections of damp hair around each one. Smaller sections make a more defined curl, so I’d rather use extra strips than a few fat ones.
- Secure. Tie or knot each strip so the hair stays put. Check that none of them will dig into your scalp when you lie down.
- Release. Sleep on them, then unwrap the strips in the morning and let the curls fall. Skip brushing; separate them with your fingers.
7. Scrunch Natural Waves
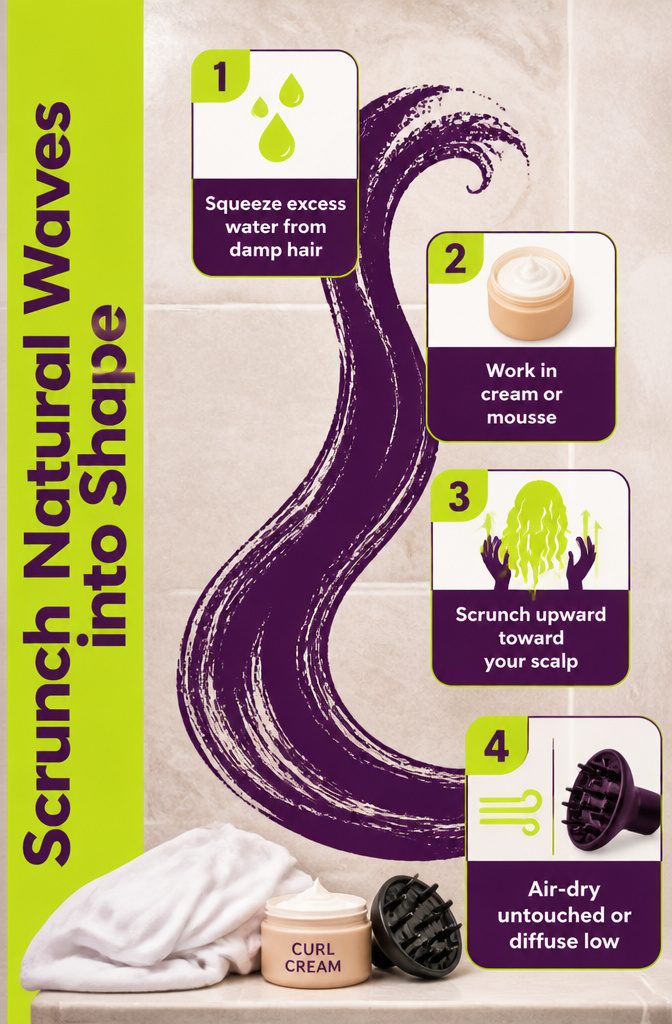
Scrunching amplifies a wave that is already there, so it suits hair with some natural bend.
- Start with damp hair. If it’s dripping, squeeze out the excess with a cotton T-shirt or microfiber towel.
- Work in curl cream or mousse, section by section.
- Cup the hair and scrunch upward, squeezing toward your scalp each time.
- Air-dry without touching it, or diffuse on low heat.
Hands off while it dries; touching it is how frizz starts. If the hair feels crunchy once it’s 100 percent dry, scrunch it gently to break up the cast.
8. Follow a Curly Girl Method Routine
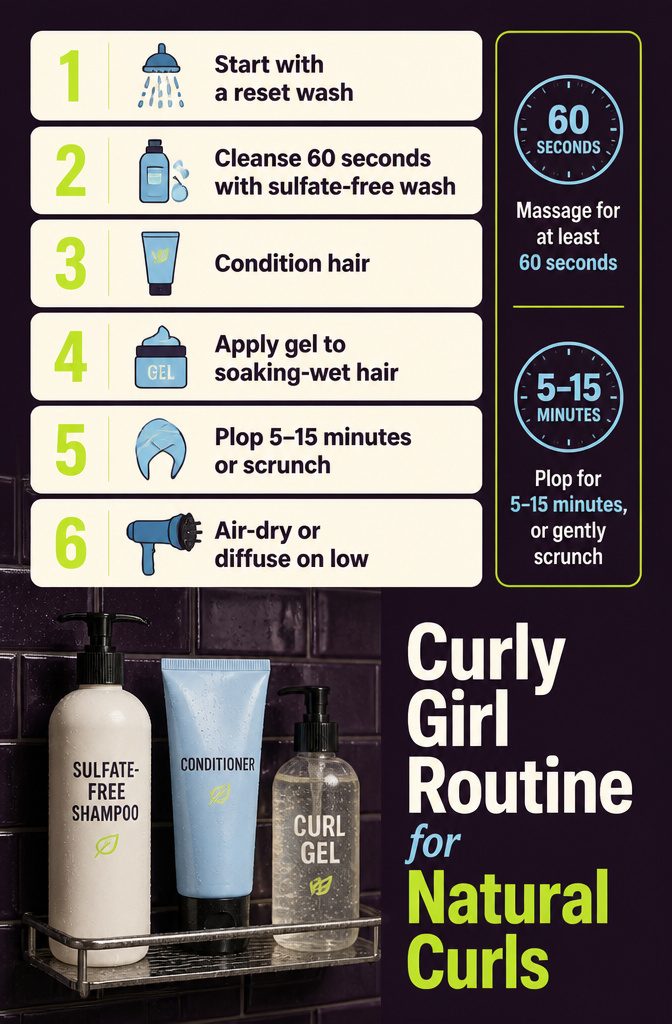
- Start with a reset wash.
- Cleanse with a sulfate-free shampoo or co-wash, massaging for at least 60 seconds.
- Condition.
- Apply gel to soaking-wet hair.
- Plop for 5–15 minutes, or gently scrunch.
- Air-dry, or diffuse on low.
Lorraine Massey built this method in Curly Girl: The Handbook, and it enhances a pattern you already have; it won’t curl straight hair.
Type 3 curls respond best, though 2C and 4A have done well. Cleanse once a week if coily, 1–3 times for thick or coarse hair, and every other day if fine and oil-prone.
Give the simplified routine 4–6 weeks, since full results can take at least six. Try each application method three times, changing product amount and wetness.
9. Use Curly Clip-In Extensions
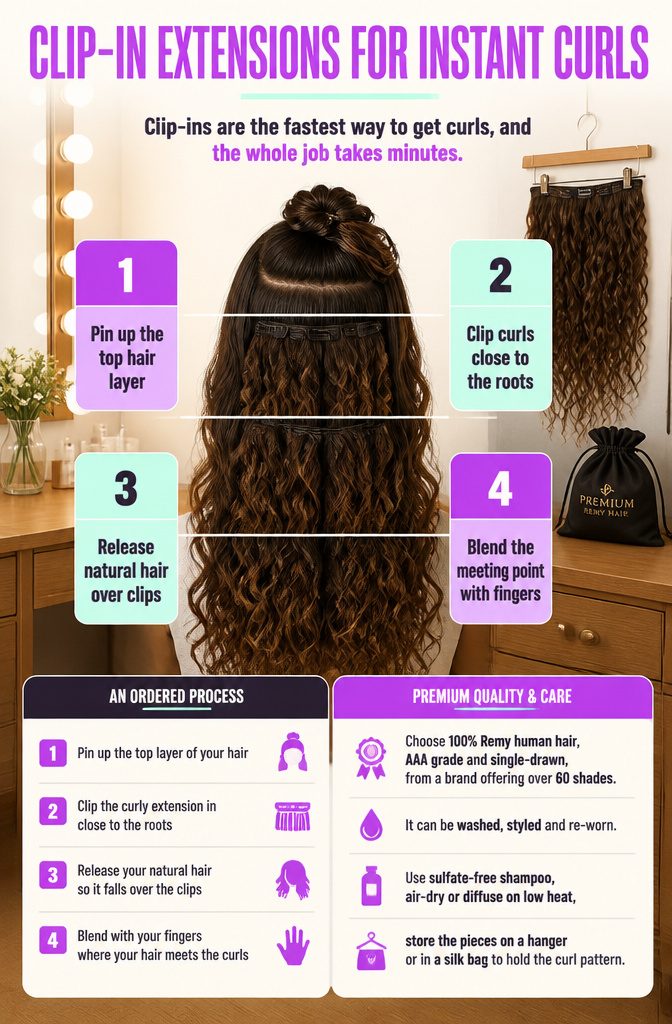
Clip-ins are the fastest way to get curls, and the whole job takes minutes.
- Pin up the top layer of your hair, out of the way.
- Clip the curly extension in close to the roots.
- Release your natural hair so it falls over the clips.
- Blend with your fingers where your hair meets the curls.
Choose 100% Remy human hair, AAA grade and single-drawn, from a brand offering over 60 shades.
It can be washed, styled and re-worn. Use sulfate-free shampoo, air-dry or diffuse on low heat, and store the pieces on a hanger or in a silk bag to hold the curl pattern.
10. Enhance Curls with Moisture, Styling Products, and Careful Drying
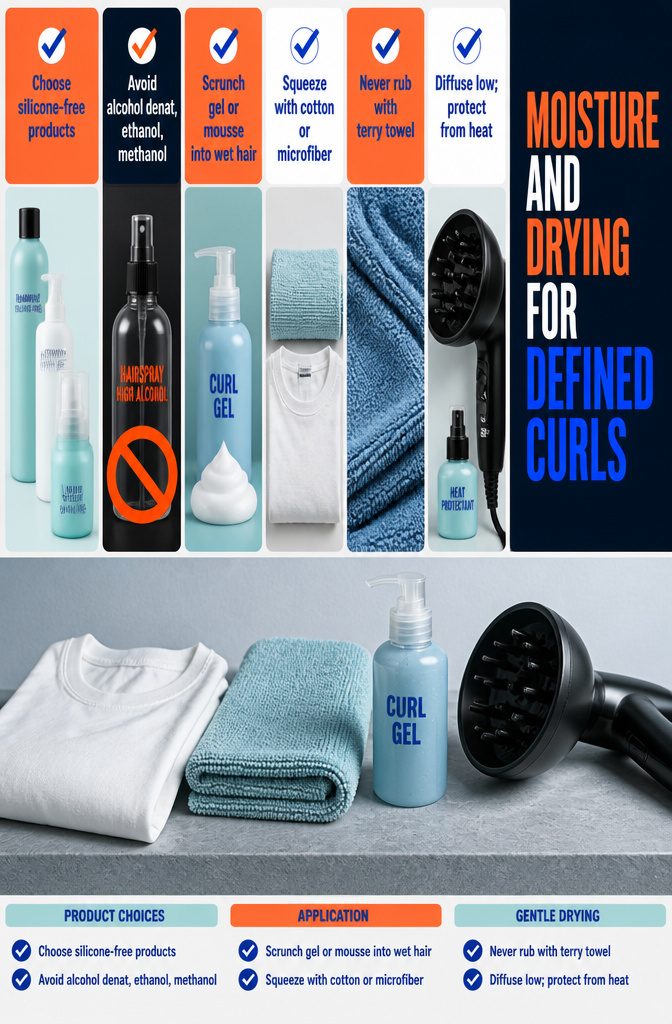
Silicones show up in 90 percent of hair products, so I read labels and pick silicone-free shampoo, conditioner and stylers.
Curly hair runs drier than straight hair, which makes mild cleansing, a little oil and a weekly treatment worth the effort. Skip anything listing alcohol denat, ethanol or methanol; a high-alcohol hairspray leaves curls stiff and less natural.
Scrunch gel or mousse into wet hair, starting at the bottom and working toward the roots.
Terry towels rough up the cuticle and cause frizz and tangles. Squeeze out the water with a cotton T-shirt or microfiber towel, never rub.
Then air-dry, or diffuse on low heat with your head upside down, working from the tips and staying off the scalp. Use a heat protectant.
11. Get a Perm for Longer-Lasting Curls
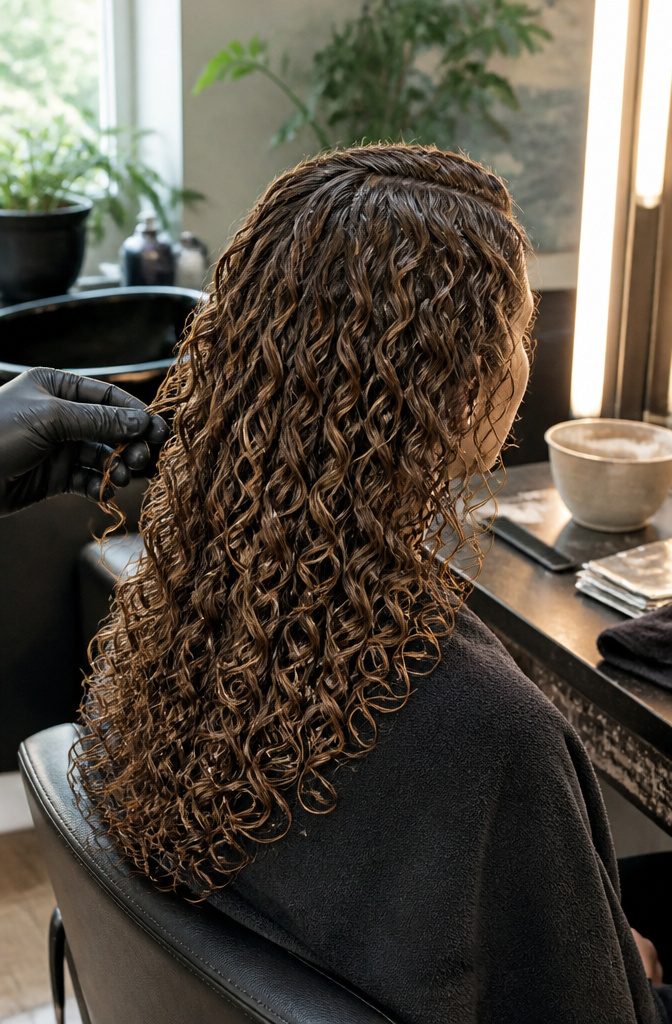
A perm is the only method in this list that changes the hair itself, so the curl doesn’t wash out or fall flat by afternoon.
The price is chemical processing, and the damage risk is real. Your hair’s current condition should decide this more than the curl pattern in your saved photo.
Commitment is the other cost.
You can’t undo a perm at home: you grow it out or cut it off. New growth comes in straight, so the line between curled and untouched hair gets more obvious each month.
I’d book one only if you want curls most mornings for months and your hair is healthy.
For a single night out, skip it. Curly clip-in extensions give you the look without chemicals and come out when you do.
Hair Texture Affects the Result
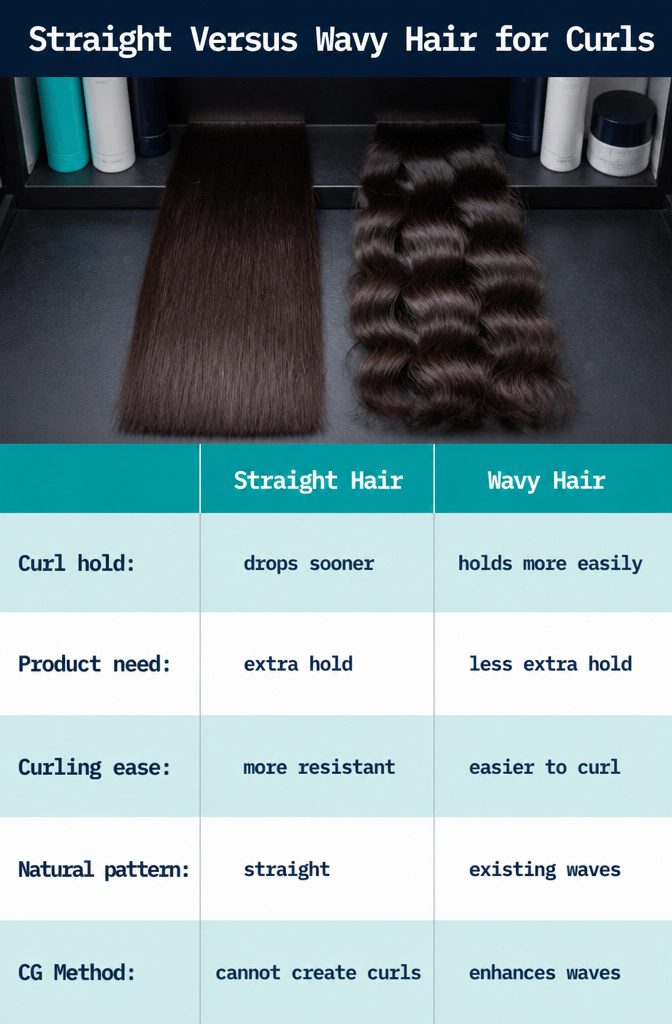
Straight hair resists curl more than wavy hair does, so curls drop sooner and need extra product for hold. Existing waves are easier to curl and easier to keep.
Curl patterns run from 2 (wavy) to 4 (kinky), with textures rated A–C. A 2B is wavy, and a 4C is tightly packed coils.
The Curly Girl Method has a hard floor:
The Curly Girl Method will help enhance your natural curl or wave pattern. It can’t create curls on hair that’s naturally straight or slightly wavy.
With straight hair I’d skip it and choose a heat or heatless style, since the method needs at least 2B waves to work with.
Cooling and Setting Help Curls Last
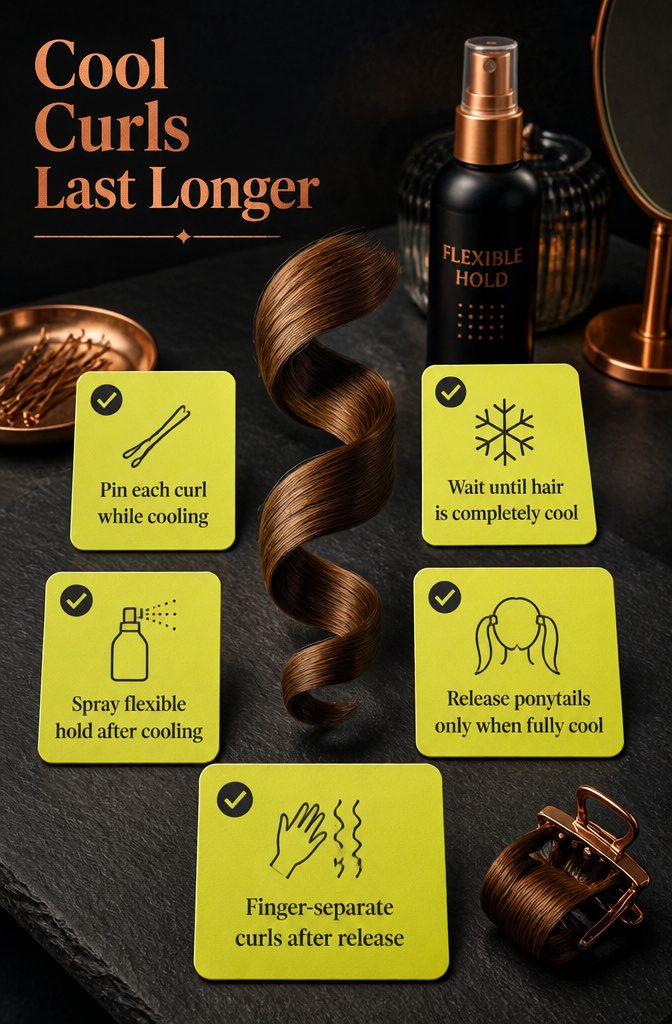
Curls set as they cool, so what you do right after the heat comes off decides how long they last.
- Pin each curl up while it cools. A pinned curl keeps its shape instead of drooping and stretching out.
- Leave your hands out of it until the hair is completely cool. Warm curls that get pulled or brushed through relax fast.
- Spray once the curls are cool, and choose light hold or flexible hold. I lean toward flexible hold because it sets the style without the crunch.
- If you curled in ponytails, take them down only after the hair has cooled all the way. Then run your fingers through to loosen the curls into soft, natural-looking pieces.
Frequently Asked Questions
Can you make straight hair curly at home?
Yes, even very straight hair can hold curls, though the result depends on your natural texture, the method and your effort. Straight hair keeps a curl for less time than wavy hair, so plan on extra product for hold.
Straighteners, curling irons, braids and rods all work, but the Curly Girl Method does not, since it only enhances waves you already have.
How can I make my straight hair permanently curly?
A perm is the only permanent option, and it works by chemically changing the hair.
You can’t undo it at home: you grow it out or cut it off, and new growth comes in straight. Curly clip-in extensions give you removable curls without that commitment.
How do I get heatless curls overnight?
Braid slightly damp hair before bed, or wrap damp sections around heatless curling ribbons or flexi-rods and sleep on them.
Smaller, tighter sections give curlier results, while fewer, looser braids give soft waves. Unwrap or unravel in the morning and loosen the curls with your fingers.
Can I curl hair extensions?
Yes, as long as they are 100% Remy human hair.
Apply heat protectant and keep your tool below 180°C (356°F). Synthetic pieces are not covered here, so check the label before you heat them.
What’s the easiest way to get curly hair?
Curly clip-in extensions are the fastest route: the whole job takes minutes, with no heat and no styling time. If you want to curl your own hair quickly, the ponytail curl hack takes minutes instead of the usual half hour.
Does the Curly Girl Method make hair curlier?
It enhances a wave or curl pattern you already have, but it can’t create curls on naturally straight or slightly wavy hair.
The method needs at least 2B waves to work with. With straight hair, a heat or heatless style is the better pick.
How long does the Curly Girl Method take to work, and what if it isn’t working?
Give the simplified routine 4–6 weeks, since full results can take at least six weeks because of the learning curve and the transition phase.
If your curls still look off after that, reassess your products and factors like porosity, dryness and frizz. Expect some trial and error along the way.
Can you brush your hair on the Curly Girl Method?
Traditional brushing can disturb your curl pattern, so the usual advice is to detangle in the shower with conditioner instead. Your hair type may call for adjustments to that rule.
How do I know if a product is Curly Girl Method-approved?
Use the Is It CG? tool: copy and paste the product’s ingredient list into it and it checks the ingredients for you.
How do I apply curl products with the Curly Girl Method?
Experiment with your application method, the amount of product and how wet your hair is, and test each method at least 3 times before judging it. A solid starting point is gel on soaking-wet hair, then a gentle scrunch.
How do you dry your hair on the Curly Girl Method?
Squeeze the water out with a cotton T-shirt or microfiber towel, never rubbing, then air-dry or diffuse on low heat. Rubbing with a terry towel roughs up the cuticle and causes frizz.
What is hair plopping?
Plopping is a no-heat technique where you lower product-treated hair onto a cotton T-shirt or microfiber towel and secure it around your head.
The fabric absorbs water and helps define curls. Leave it on for 5–15 minutes, then air-dry or diffuse on low.





